NiFi の Elasticsearch 7.x 対応奮闘記
04 Dec 2020
あいやー、2018年でブログ更新止まってるじゃないすか!と気づいたのが、 アドベントカレンダーに参加した一番のメリットでしょうか。。という訳で、この記事は Elasticsearch アドベントカレンダー の 12/4 の記事でございます。 Elasticsearch と Apach NiFi について!
データだけでなく、キャリアの道もつないでくれた NiFi
NiFi というのはシステム間のデータ連携を行うデータフローを構築、運用管理するためのオープンソースプロジェクトです。 Web ブラウザから直感的にデータフローのグラフを操作できるのが便利ですね、多種多様なデータソースに対応しています。
そんな NiFi の開発をするきっかけになったのは、前前職の Coucnbase を広めるためという目的でした。その後ご縁があり NiFi 開発メンバが多く在籍する Cloudera (当時は Hortonworks) に転職。 それから 4年弱、 NiFi の開発者として家に籠もってカリカリコードを書いていたのですが、人との直接的なやりとりが恋しくなり、 Elastic でトレーニング講師の募集を見て面白そうだなーと思い転職、現在は Elastic の Education Engineer として一年を経過したところです。
Elasticsearch は様々なデータソースから発生するログやメトリックなどのデータを蓄積し分析するためのプラットフォームでもよく使われます。 そんな環境の中でデータパイプラインを構築する際に、 NiFi で培ったデータ連携のノウハウや Kafka などのメッセージングシステム、色々なクラウドサービスとの連携などの経験は非常に役立っていると思います。
そして今日、 Elasticsearch 向けのアドベントカレンダーの題材として NiFi と Elasticsearch の連携の話を書いてみようと思った訳です。
やっとこさ NiFi が Elasticsearch 7.x に対応
NiFi ではデータフローを構成する部品としてプロセッサがあります。 Elasticsearch などのデータソースと連携するために PutElasticsearch や FetchElasticsearch などのプロセッサが色々あるのですが、これが Elasticsearch 7.x に対応できていない問題が発生していました。
NIFI-6403 ElasticSearch field selection broken in Elastic 7.0+ で報告されている通り、 _souce_exclude や _source_include が 7.0 から _source_excludes など他の API と形式を揃えるために複数形の名称に変更されたのが原因です。パラメータ名を揃えるために。。なかなかアグレッシブな breaking change っすね。
NiFi のプロセッサでもそれに追随すれば良いのですが、色々と考慮しないといけないことがある訳です。主な問題は以下の二つ:
- NiFi を使っているユーザの Elasticsearch バージョンは 7.x とは限らない
- Elasticsearch 向けのプロセッサが乱立している
一つ目は色々なデータソースを繋ぐ NiFi ならではの問題かもしれません。 極端な話、 Elasticsearch 2.x と、 5.x と 6.x と 7.x を一つの NiFi データフローで利用している方もいるかもしれないのです。 また、そのように複数のバージョンが混在する環境でデータをやりとりする仕組みとして NiFi はとても便利です。 NiFi では各モジュールでバージョンの互換性の壁を超えるために、例えば Kafka だったら ConsumeKafka_1_0、ConsumeKafka_2_0 の様に各バージョン向けのプロセッサを分けてクラスローダも分離して対応することがあります。 Elasticsearch のプロセッサもその様にはっきり分かれていれば簡単だったのですが、プロセッサが乱立していたのです。 Elasticsearch クライアントが元々 REST API を使うものと、 Transport プロトコルを使うものと二種類あったのが、 REST 推奨になった経緯も影響してますね。
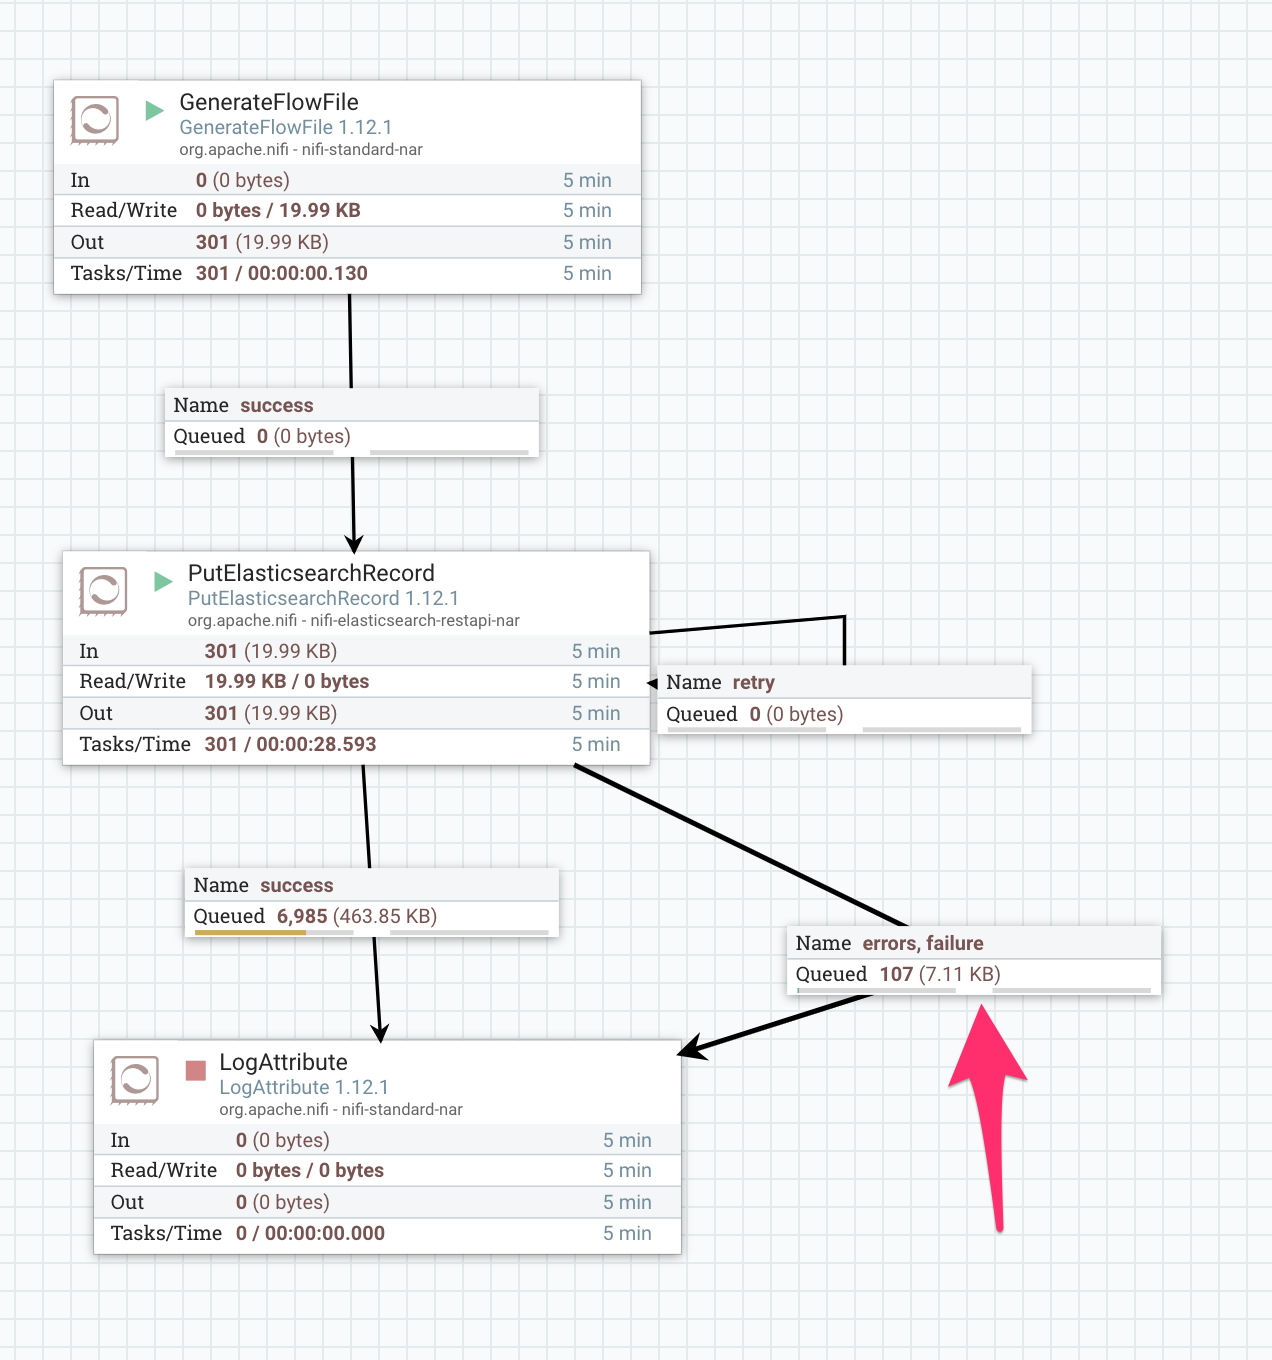
これらの問題を解決するためにプルリクエストがいくつか送られ、私もレビューに参加したのですが、なかなかごちゃごちゃしてました。 プロセッサの一覧と、対象の Elasticsearch バージョン、そして NIFI-6403 と NIFI-6404 (ドキュメントの type 指定を必須じゃなくする) を解決する PR #4667 をレビューする際にテストした結果を表にまとめてみましょう:
| Processor | 対象 ES ver | 5.6 | 6.8 | 7.10 |
|---|---|---|---|---|
| PutElasticsearchHttp | 5.0+ | OK | OK | OK |
| PutElasticsearchHttpRecord | 5.0+ | OK | OK | OK |
| FetchElasticsearchHttp | 5.0+ | OK | OK | NG -> OK 注1 |
| QueryElasticsearchHttp | 5.0+ | OK | OK | NG -> OK 注1 |
| ScrollElasticsearchHttp | 5.0+ | OK | OK | NG -> OK 注1 |
| DeleteByQueryElasticsearch | 5.0+ | OK | OK | OK |
| JsonQueryElasticsearch | 5.0+ | OK | OK | OK |
| PutElasticsearchRecord | 5.0+ | OK | OK? 注2 | OK |
| Put, Fetch, DeleteElasticsearch5 注3 | 5.x | - | - | - |
| Fetch, PutElasticsearch | 2.x | - | - | - |
注釈:
- これが NIFI-6403 で対応された部分です。これらのプロセッサで Elasticsearch から取得するフィールドを指定すると
_source_includeAPI パラメータの名前がもう使えなくなっているのでエラーになってしまっていた訳ですね。 - 6.8 へアップグレードする際にフルクラスタリスタートが必要だったのですが、 Http 系プロセッサはリトライに FlowFile をうまく回してくれてデータロスはありませんでしたが、 PutElasticsearchRecord は
failureリレーションシップに FlowFile をルーティングしてしまいました。これではデータロスが発生してしまいます。 NIFI-8048 で対応しました。 - 実は Elasticsearch 5.x 向けのプロセッサが存在します。しかしこれらは今は推奨されなくなった Transport プロトコルを使ったクライアント実装でもあり、他のプロセッサで代替えが効くため、デフォルトのビルドからは対象外となりました。NIFI-7604
PR #4667 が適用されたあとは上記表の様にそれぞれ対象の Elasticsearch バージョンと問題なく連携が可能になっています。
テストはパッチ適用前と後で、5.6 から 7.10 までのアップグレードシナリオをテストしました。 アップグレードの際は NiFi のデータフローは止めずに、レジリエントな実装になっているかも確認してみました。
Elasticsearch 5.0 以上で利用可能なプロセッサは XXXElasticsearchHttp 系のものと XXXElasticsearch 系の二種類があります。
Http 系のプロセッサは OkHttp を利用しており、 HTTP のリクエストに送信する JSON ペイロードを Java コード内で直接構築しています。
XXXElasticsearch 系の方は elasticsearch-rest-client-5.6.16 を使っています。
7.0 の breaking change で影響があったのはリクエストの JSON を独自に作成していたからなんですね。
気付き
今回のプルリクエストレビューを通して色々な気付きがありました:
- NiFi で全てのキューを空っぽにする ‘Empty all queues’ という操作が可能になってました!これはテストの時めちゃくちゃ便利です。
- ScrollElasticsearchHttp は不思議なプロセッサです。大量のドキュメントをデータベースのカーソルみたいな仕組みで数回に分けて取得できます。一回のスクロールが終わると、終わったことをプロセッサのステートに記録して、その後は何にもしません。そういう設計です。 NiFi プロセッサの中では珍しい「一発屋さん」です。
- レジリエンシー!テストではアップグレード中にもデータ更新やクエリを NiFi から実行し続けてみました。 Kibana からアップグレードアシスタンスを実行する時にインデックスをクローズして新しいマッピングのものに切り替えて、という手順が必要なのですが、その間でも NiFi のリトライキューに更新リクエストが上手く溜まって、アップグレードが終わったらちゃんと Elasticsearch に登録されていました。 NiFi ありがたや。
- プロセッサの設定で
upsertというのがあり、 Elasticsearch の CRUD 操作で単純にドキュメントを PUT/POST したら常にupsertなんじゃないの?と他のデータベースでの insert or update 的な解釈で upsert を捉えていたので、不思議に思いドキュメントを読んだら、 Update API のパラメータで upsert というのがあるんですね。初めて知りました。これは対象ドキュメントがいる場合はスクリプトでドキュメントを加工して、いない場合は upsert で指定したドキュメントを初期値とする機能です! - Elasticsearch は Elasticsearch Service を使ってテストしました。アップグレード簡単ですもん。全てのアップグレードをローリングアップグレードで行いたかったのですが、5.x から 6.x ではたとえ 5.6 からのアップグレードであっても ESS の場合必ずフルクラスタリスタートが必要になるみたいです。ドキュメントにも記載あり。 “In version 6.x, TLS between Elasticsearch cluster nodes is always enabled on Elasticsearch Service. To enable internal TLS between cluster nodes, Elasticsearch cluster must perform a full cluster restart on Elasticsearch Service, even if you are upgrading from version 5.6.”
- Kibana の画面、めっちゃ変わったよね!
久々にプルリク送信!
Elasticsearch の 5.6 から 6.8 へのアップグレード時にフルクラスタリスタートが必要だったのですが、 PutElasticsearchRecord はリスタート中に FlowFile を retry ではなく failure にルーティングしてしまいました。
このプロセッサではリトライ可能かどうかの判定を発生した例外のクラス名で判断していたのですが、以下の例外は想定されていなかった様子です。 ステータスコードは 503 だし、メッセージもメンテナンス、リカバリ中と明示されているのでこれは救ってあげたいですね:
org.apache.nifi.elasticsearch.ElasticsearchError: org.elasticsearch.client.ResponseException: POST https://xxx.found.io:9243/_bulk: HTTP/1.1 503 Service Unavailable
{"ok":false,"message":"Resource is under maintenance / recovery."}

        at org.apache.nifi.elasticsearch.ElasticSearchClientServiceImpl.bulk(ElasticSearchClientServiceImpl.java:274)
修正は簡単そうだったので NIFI-8048 を発行してプルリクを投げると翌日すぐにマージされました。やはりこんな感じでオープンソースの開発に関わるのは好奇心そそられて楽しいもんです。 最初はこんがらがってごちゃごちゃに絡まっていた糸が一本一本ほつれて明らかになっていく過程が好き。ほどけないときは物凄いストレスですけど!
Apache NiFi, PullRequest#2750: Couchbase連携強化
04 Jun 2018
初めてApache NiFiプロジェクトにCouchbase接続用の部品をコントリビュートしてから早二年半くらい経つのですね。。その後は他のエリアを扱ってて、特にメンテできてなかったのですが、NiFiもCouchbaseもそれぞれに進化しています。久々に新しい機能を追加するPull Requestを投げてみました!
注: 執筆時点ではまだレビュー中なので、本記事の内容は変わる可能性があります。 Disclaimer: The content of this post describes the new contributions those are not merged into Apache NiFi project yet as of this writing, and may change.
新機能の一覧
本記事で紹介するNiFiとCouchbase連携の新機能は次のJIRAチケットが対象です。NIFI-5054: Couchbase Authentication, NIFI-5257: Expand Couchbase integration。
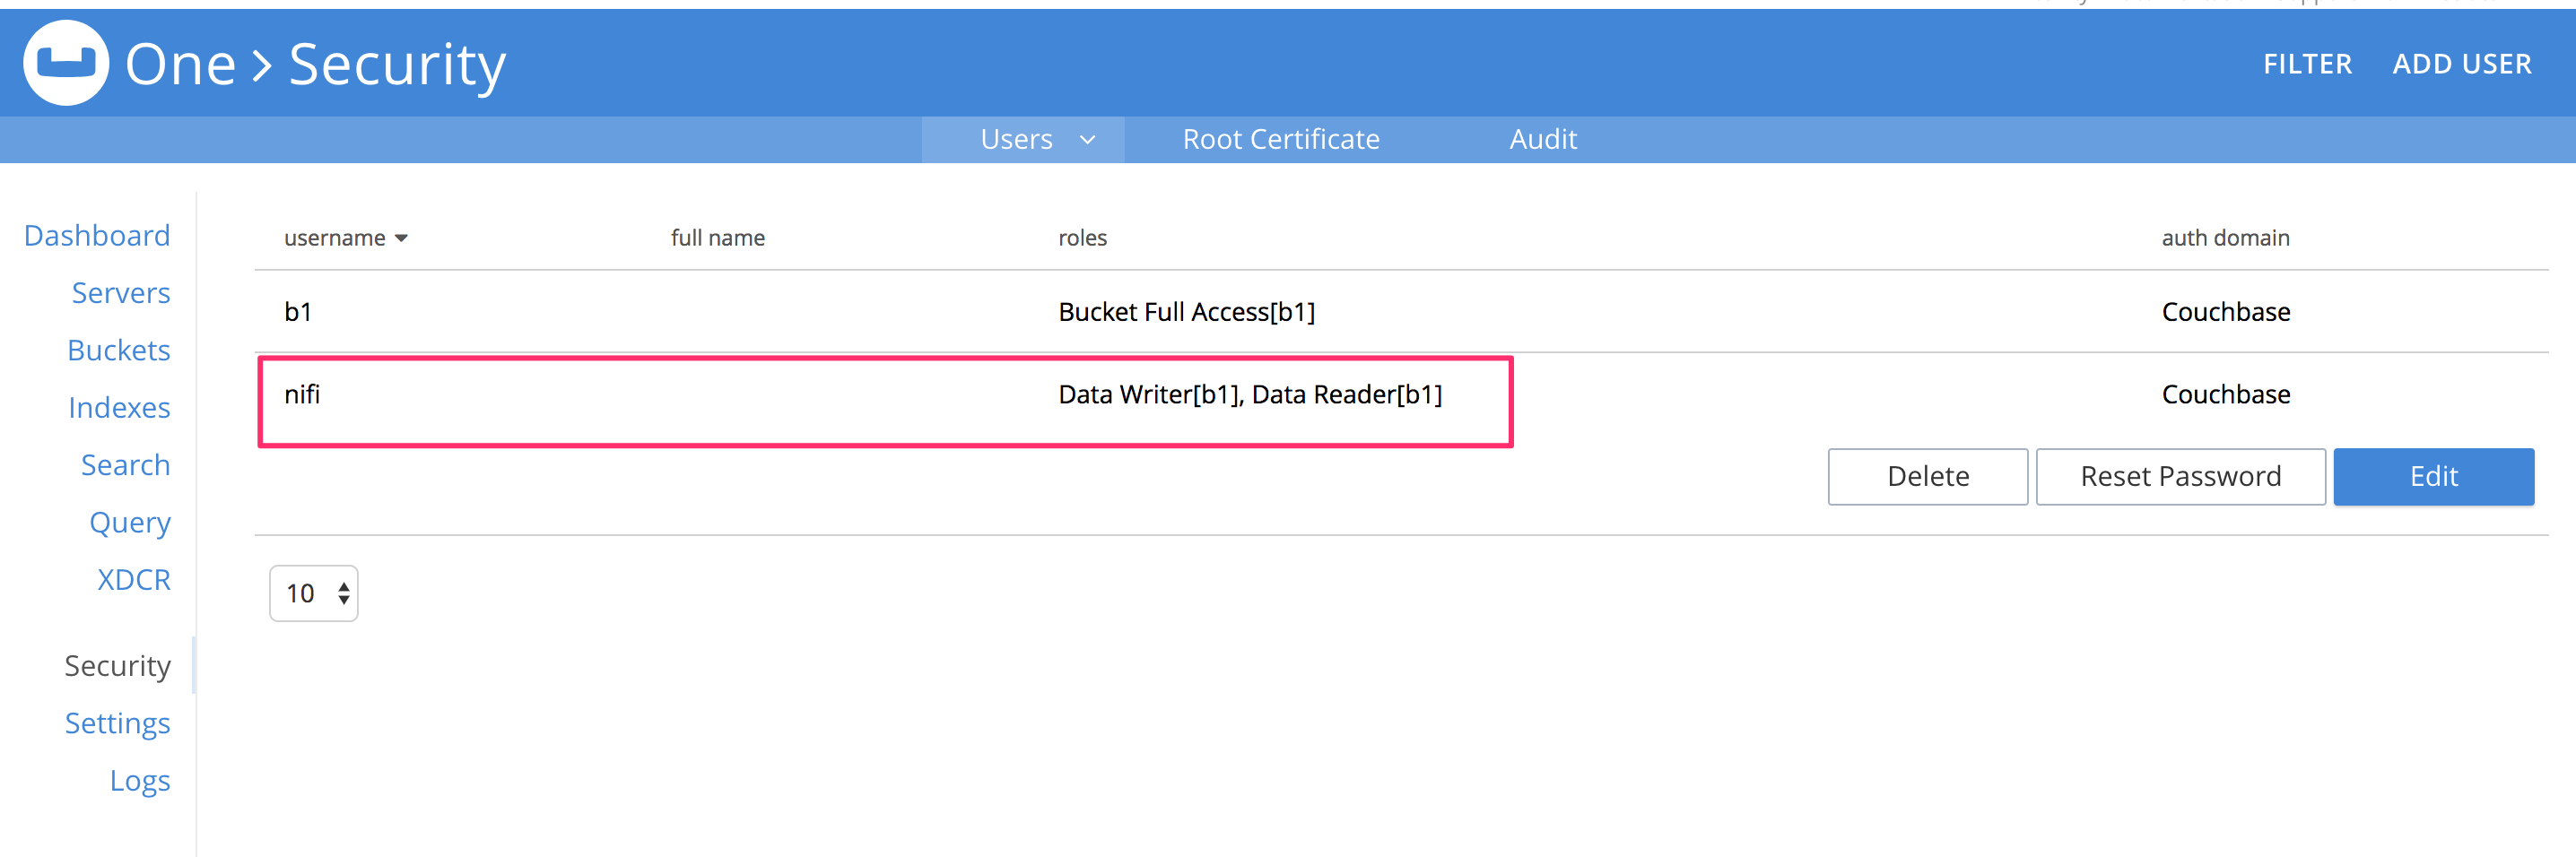
- User/Password認証、RBAC (Roll Based Access Control)
- CouchbaseをNiFiのCacheストレージとして使おう! CouchbaseMapCacheClient
- NiFiのFlowFileをエンリッチ! CouchbaseKeyValueLookupService
- NiFiのRecordをエンリッチ! CouchbaseRecordLookupService
1. User/Password認証
Couchbase Server 5.0以前は、Bucketにパスワードを設定できました。5.0からバケットとは独立して、ユーザ/パスワード認証ができるようになりました。 このユーザ認証はユーザに紐づくロールでの権限ができるので、特定のバケットを読み取り専用にするなど、アクセス制御が可能です。 NiFiのProcessorは随分昔に作られたままで、この認証方式に対応していなかったので、これに対応しました。

2. CouchbaseをNiFiのCacheストレージとして使おう!
NiFiのフロー内部のそれぞれのProcessor間で情報を引き継ぐオブジェクトはFlowFileです。FlowFileのAttributeを使えば、複数のProcessorで変数を元に処理を行うことができます。例えばUpdateAttributeなどでAttribute ‘x’の値を3としておき、後続のRouteOnAttributeで’x > 2’といった条件でフローを分岐させるなどです。
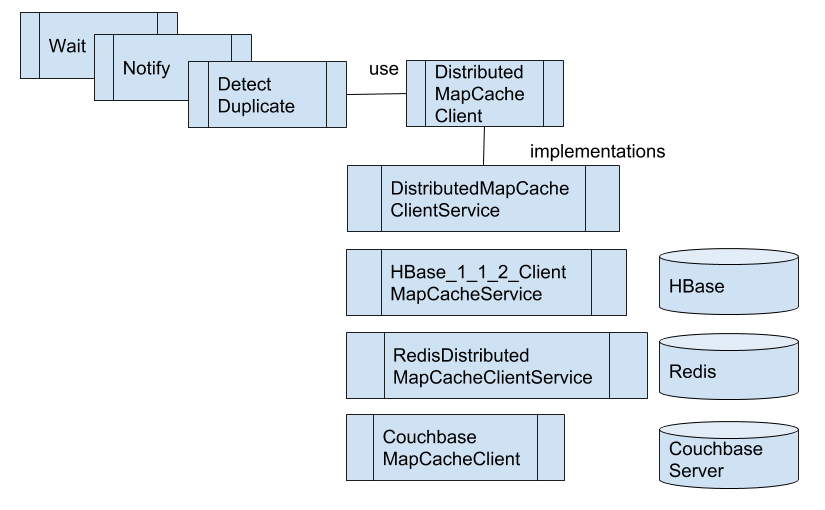
しかし、FlowFileのAttributeでは、複数のFlowFileにまたがって状態を管理することができません。どうしてもProcessorとして状態を保持する必要があります。さらに複数のProcessorで状態を共有するには、Processor内部の変数管理でも実現できません。このようなケースに対応するために、NiFiではDistributedMapCacheというController Serviceを使います。
Wait/Notifyが良い例です。WaitとNotifyという二つのProcessorを組み合わせて、条件に一致するまでFlowFileを待たせることができます。WaitはWait/Notifyペア共通の値となる、SignalIdentifierをキーとして、DistributedMapCacheに保持されている状態を参照し、FlowFileをsuccessまたはwaitのRelationshipへと転送します。Notifyは同じSignalIdentifierをキーとして、DistributedMapCacheの値を更新します。
Wait/Notifyに関する詳しい説明は、こちらの記事、How to wait for all fragments to be processed, then do something?も参考にしてください。
さて、これらのProcessorはDistributedMapCacheという仕組み(プロトコル)を使っているクライアントにあたります。その先の実際に値を保持しているプログラムとして、NiFiはDistributedMapCacheServerというController Serviceをバンドルしています。NiFiをインストールすれば使えるので便利なのですが、NiFiをクラスタモードで利用していると次のような問題があります。
- 現在、Primary NodeでのみController Serviceを動かす仕組みがないので、それぞれのNiFiノード上でDistributedMapCacheServerを動作させる必要がある
- この際、各ノードで閉じたキャッシュ管理をする分には、DistributedMapCacheの接続先を、’localhost’にすれば良いのだが、クラスタ全体で共有するとなると、どこかのノードのアドレスを指定する必要がある。例、3ノード、n1, n2, n3で共有したい場合、接続先をn1にすれば共有は可能
- 前述の例で、接続先のノードがダウンしてしまうと、そのノードが復旧するまでキャッシュも利用できない
さて、PR-2750に含まれるのが、このDistributedMapCacheプロトコルをCouchbase Serverに対して実行できる、CouchbaseMapCacheClientというController Serviceです。外部のCouchbase Serverクラスタをキャッシュストレージとして利用できるので、前述のNiFiクラスタ環境で発生する課題を解決できます。
加えて、Couchbase Serverが持つノード間レプリケーションやデータ永続化でさらに可用性の高いキャッシュストレージとして利用できますね。そもそもCouchbase Serverを高性能なキャッシュサーバとして利用するケースが多いので、この組み合わせは理にかなっているでしょう。
3. NiFiのFlowFileをエンリッチ! CouchbaseKeyValueLookupService
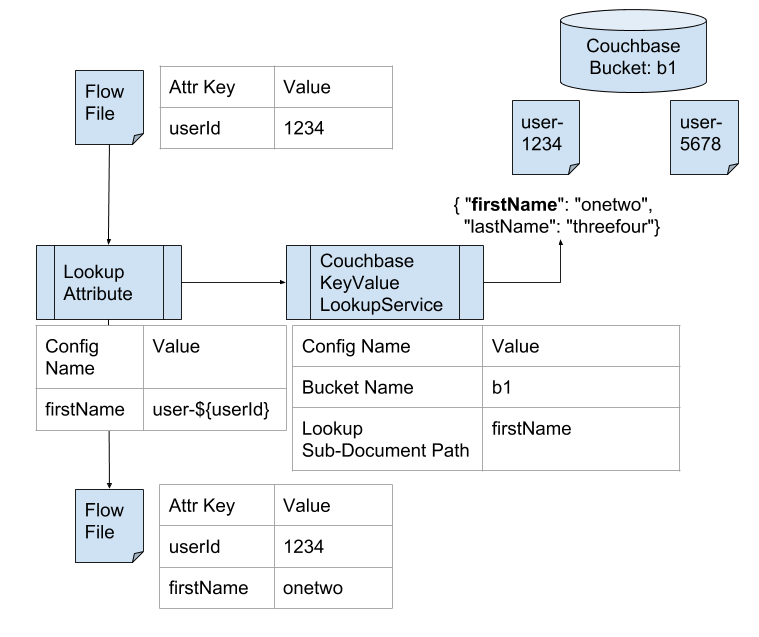
NiFiを利用する際に、入力のFlowFileにさらなる情報を付与する「エンリッチ」という処理があります。LookupServiceというController Serviceの実相クラスがいくつかあり、対応するデータソースを参照して、FlowFileのAttributeに情報を付け加えることができます。
今回、CouchbaseKeyValueLookupServiceを追加して、Couchbase Serverに保存されたドキュメントのデータをLookupできるようにしました。
さらに、Sub Document APIを利用して、ドキュメントの一部だけを参照できるようにしています。
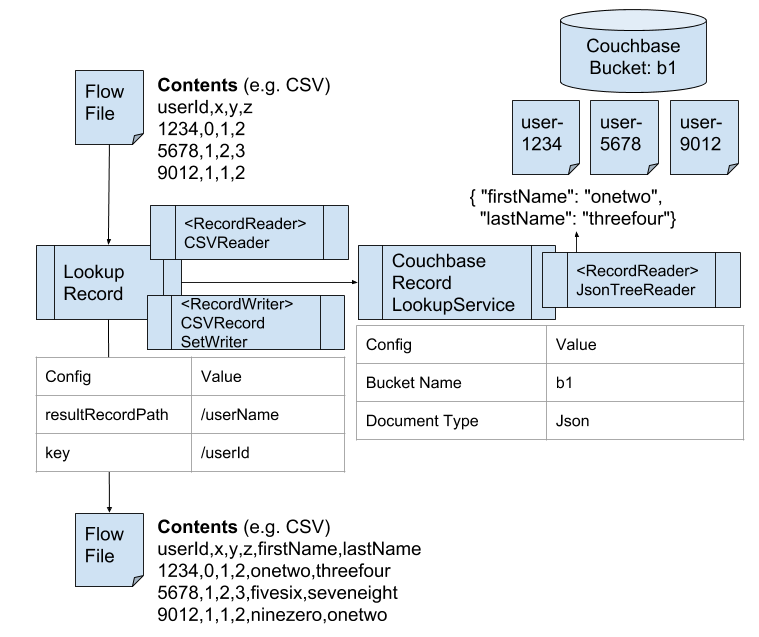
4. NiFiのRecordをエンリッチ! CouchbaseRecordLookupService
NiFiではRecordというデータモデルをうまく利用すると、FlowFileのコンテンツを効率的に扱えます。単一のFlowFile内に複数のRecordオブジェクトを格納できるます。先のLookupAttributeはFlowFile単位でのLookupでしたが、LookupRecordを使うと、RecordごとにLookupが可能です。
CouchbaseRecordLookupServiceを利用すると、Couchbase Serverに保存されたドキュメントをRecordに付与できます。
Apache NiFiのサブプロジェクトMiNiFiのC2を試してみる
30 Nov 2017
Apache NiFiのサブプロジェクト、MiNiFiを使うと、小さなフットプリントでデータフローを実行できます。そのMiNiFiのフローをCommand and ControlするサーバプログラムがApache NiFi MiNiFi Command and Control (C2) Serverです。今回はC2サーバを試してみます。
ビルド
# MiNiFiプロジェクトをクローン
git clone git@github.com:apache/nifi-minifi.git

# ビルド
cd nifi-minifi
mvn -T 2.0C -DskipTests clean install
起動してみる
ビルドが成功したら、minifi-c2のREADME.mdに記載の通り、出来上がったbin.tar.gzを適当な場所に展開しましょう。と思いましたが、ビルド時に作成され、すでに展開されているディレクトリもあるので、そこで作業してしまいます。
設定ファイルの説明が記載されていますが、とりあえずデフォルトのまま、起動シェルを叩いてみます。
cd nifi-minifi/minifi-c2/minifi-c2-assembly/target/minifi-c2-0.2.1-SNAPSHOT-bin/minifi-c2-0.2.1-SNAPSHOT/
./bin/c2.sh

# ちなみに、debugと引数に入れると、5005ポートでremote debugが可能に。
./bin/c2.sh debug
以下のログが表示されるので、10080番ポートで起動しているようですね:
2017-11-29 22:55:49,821 INFO [main] o.eclipse.jetty.server.AbstractConnector Started ServerConnector@5286c33a{HTTP/1.1,[http/1.1]}{0.0.0.0:10080}
2017-11-29 22:55:49,822 INFO [main] org.eclipse.jetty.server.Server Started @1885ms
APIを叩いてみる
CacheConfigurationProviderはfilesディレクトリの中身を参照していて、files内のファイルに対応したURLへとリクエストを投げると、そのファイルの内容が返却されるようです。cURL実行すると、確かに返ってきますね。注READMEに記載のURL例はraspiですが、実際のファイル名はraspi3:
curl -i "http://localhost:10080/c2/config?class=raspi3&version=1"

MiNiFi Config Version: 3
Flow Controller:
  name: MiNiFi Flow
  comment: ''
(以下省略)
CacheConfigurationProviderは単にファイルを返してるだけじゃないか
CacheConfigurationProviderのソース見ると、ConfigurationCacheの実装はinjectできるようになってますが、非常に単純ですね。
これだけだとあまりおもしろくないので、他のConfigurationProviderも見てみましょう。
DelegatingConfigurationProviderはとあるC2サーバから更に他のC2サーバへとリクエストを委譲するやつ。
NiFiRestConfigurationProviderが面白そうです。 CacheConfigurationProviderの強化版という感じで、Cacheに該当のConfigが無い場合はNiFiのREST APIを叩いて、templateを探してダウンロードしてCacheに登録してくれる代物!
その前に、MiNiFiをセットアップ
MiNiFiのGetting Startedを参考に、TailFailからS2SでNiFiへデータ転送するMiNiFiフローを作って動作確認。
コマンド備忘録:
# TemplateをDLして、config.ymlに変換
~/dev/nifi-minifi/minifi-toolkit/minifi-toolkit-assembly/target/minifi-toolkit-0.2.1-SNAPSHOT-bin/minifi-toolkit-0.2.1-SNAPSHOT/bin/config.sh transform ~/Downloads/minifi-flow-v1.xml conf/config.yml

# Tail対象のファイルに追記してNiFiにデータが転送されたことを確認。
echo hello >> /tmp/input.txt
OK, it works!
NiFiRestConfigurationProviderを試す
vi conf/minifi-c2-context.xml
# 下記定義を有効に
<bean class="org.apache.nifi.minifi.c2.provider.nifi.rest.NiFiRestConfigurationProvider">
    <constructor-arg>
        <bean class="org.apache.nifi.minifi.c2.cache.filesystem.FileSystemConfigurationCache">
            <constructor-arg>
                <value>./cache</value>
            </constructor-arg>
            <constructor-arg>
                <value>${class}/${class}</value>
            </constructor-arg>
        </bean>
    </constructor-arg>
    <constructor-arg>
        <value>http://localhost:8080/nifi-api</value>
    </constructor-arg>
    <constructor-arg>
        <value>${class}.v${version}</value>
    </constructor-arg>
</bean>
でC2を再起動。
なるほど、versionを指定しなければ最新をとってくれるのか。
TailFileの読み込みファイル名を変更する前後で、minifi.v1とminifi.v2のtemplateを作成し、C2に問い合わせ。
# 変更前、minifi.v1という名前のtemplateをNiFiで作成しておく
curl -i "http://localhost:10080/c2/config?class=minifi" |grep "File to Tail"
# 結果
      File to Tail: /tmp/input.txt


# NiFiでTaiFileの対象を変更して、minifi.v2のtemplateを作成
curl -i "http://localhost:10080/c2/config?class=minifi" |grep "File to Tail"
# 結果
      File to Tail: /tmp/input2.txt
まとめ
コマンド実行のメモ程度の内容ですが、一通り、NiFi、MiNiFi、C2 Serverと連携して動かすことができたので満足!これでMiNiFiのフローをNiFi側で管理できる準備が整いました。次回はMiNiFi側の設定もちゃんとやって自動化するところまでやってみようかと思いまーす。
StreamlineのUDFが見つからない問題
26 Jun 2017
HDF 3.0にて追加されたSAMですが、何故か私の環境ではAggregate関数がうまく動かず、Stormへとトポロジをサブミットする際にJarが見つからないFileNotFoundExceptionが発生していました。Streamlineのソースコードを追っかけて、やっと原因が分かったのでメモしておきます。
症状
SAMからAppデプロイ時にエラーが発生、/var/log/streamline/streamline.logには以下のstack trace:
ERROR  [04:25:36.890] [ForkJoinPool-4-worker-4] c.h.s.c.u.ParallelStreamUtil -  Got exception while running async task java.lang.RuntimeException: java.io.FileNotFoundException: /hdf/streamline/jars/streamline-functions-f2ff4dc3-0698-4a1c-8ff8-7e150545c9f5.jar (No such file or directory)
        at com.hortonworks.streamline.common.util.ParallelStreamUtil.lambda$runAsync$0(ParallelStreamUtil.java:58)
        at java.util.concurrent.CompletableFuture$AsyncSupply.run(CompletableFuture.java:1590)
        at java.util.concurrent.CompletableFuture$AsyncSupply.exec(CompletableFuture.java:1582)
        at java.util.concurrent.ForkJoinTask.doExec(ForkJoinTask.java:289)
        at java.util.concurrent.ForkJoinPool$WorkQueue.runTask(ForkJoinPool.java:1056)
        at java.util.concurrent.ForkJoinPool.runWorker(ForkJoinPool.java:1692)
        at java.util.concurrent.ForkJoinWorkerThread.run(ForkJoinWorkerThread.java:157)
Caused by: java.io.FileNotFoundException: /hdf/streamline/jars/streamline-functions-f2ff4dc3-0698-4a1c-8ff8-7e150545c9f5.jar (No such file or directory)
        at java.io.FileInputStream.open0(Native Method)
        at java.io.FileInputStream.open(FileInputStream.java:195)
        at java.io.FileInputStream.<init>(FileInputStream.java:138)
        at com.hortonworks.streamline.common.util.LocalFileSystemStorage.downloadFile(LocalFileSystemStorage.java:86)
        at com.hortonworks.streamline.streams.actions.topology.service.TopologyActionsService.downloadAndCopyJars(TopologyActionsService.java:210)
        at com.hortonworks.streamline.streams.actions.topology.service.TopologyActionsService.setUpExtraJars(TopologyActionsService.java:193)
        at com.hortonworks.streamline.streams.actions.topology.state.TopologyStates$4.deploy(TopologyStates.java:95)
        at com.hortonworks.streamline.streams.actions.topology.state.TopologyContext.deploy(TopologyContext.java:87)
        at com.hortonworks.streamline.streams.actions.topology.service.TopologyActionsService.deployTopology(TopologyActionsService.java:116)
        at com.hortonworks.streamline.streams.service.TopologyCatalogResource.lambda$deploy$3(TopologyCatalogResource.java:493)
        at com.hortonworks.streamline.common.util.ParallelStreamUtil.lambda$runAsync$0(ParallelStreamUtil.java:56)
        ... 6 common frames omitted
SAMでAGGREGATEを使うと発生する。
原因
エラーの通り、必要なjarファイルがなくなっている。 SAMインストール時にバンドルされているUDF(AVGとかMIN, MAXとか)はbootstrap-udf.shからStreamlineのAPIへとPOSTされる。 しかし何らかの操作で/hdf/streamline/jar内のファイルが削除されてしまった模様。
私の場合は、SAMの再インストールを試みたときに、AmbariからSAMのサービスを消した段階で消えてしまったと考えられます。ディレクトリをバックアップとして名称変更したため。
ファイルは無いけど、データベースにはUDFの情報が残ってしまっているのが原因。
MySQL内のSAMのメタデータを覗いてみると、次のようなレコードがありました:
$ mysql -u streamline -p

mysql> use streamline;
mysql> select id, name, jarStoragePath from udf;
+----+-------------+---------------------------------------------------------------+
| id | name        | jarStoragePath                                                |
+----+-------------+---------------------------------------------------------------+
|  1 | STDDEV      | streamline-functions-f2ff4dc3-0698-4a1c-8ff8-7e150545c9f5.jar |
|  2 | STDDEVP     | streamline-functions-f2ff4dc3-0698-4a1c-8ff8-7e150545c9f5.jar |
|  3 | VARIANCE    | streamline-functions-f2ff4dc3-0698-4a1c-8ff8-7e150545c9f5.jar |
|  4 | VARIANCEP   | streamline-functions-f2ff4dc3-0698-4a1c-8ff8-7e150545c9f5.jar |
|  5 | MEAN        | streamline-functions-f2ff4dc3-0698-4a1c-8ff8-7e150545c9f5.jar |
|  6 | NUMBERSUM   | streamline-functions-f2ff4dc3-0698-4a1c-8ff8-7e150545c9f5.jar |
|  7 | LONGCOUNT   | streamline-functions-f2ff4dc3-0698-4a1c-8ff8-7e150545c9f5.jar |
|  8 | IDENTITY    | streamline-functions-f2ff4dc3-0698-4a1c-8ff8-7e150545c9f5.jar |
|  9 | MIN         | builtin                                                       |
| 10 | MAX         | builtin                                                       |
| 11 | UPPER       | builtin                                                       |
| 12 | LOWER       | builtin                                                       |
| 13 | INITCAP     | builtin                                                       |
| 14 | SUBSTRING   | builtin                                                       |
| 15 | CHAR_LENGTH | builtin                                                       |
| 16 | CONCAT      | builtin                                                       |
| 17 | ROUND       | streamline-functions-664a23f1-f736-472d-a63d-3b3a52e1ab39.jar |
+----+-------------+---------------------------------------------------------------+
17 rows in set (0.00 sec)
修復方法
bootstrap-udf.shがこれらのUDFをインストールするので、手動で再実行することにしました。 すでに同名のUDFがあるとAPIがエラーになるので、UDFテーブルをクリアしてから実行:
mysql> truncate udf;

# 再作成
cd /usr/hdf/current/streamline
bootstrap/bootstrap-udf.sh http://localhost:7777/api/v1/catalog
これで無事にAppがデプロイできるようになりました。
今回参照したソースコード
- bootstrap-udf.sh: ここからStreamlineのAPIを叩いて必要なUDFをインストールしています。API実行方法の良いサンプルにもなりますね。
- StormTopologyDependenciesHandler.java: SAMのGUIでデザインしたAppから作成されたトポロジを解析して、依存関係を解決しています。
- Mean.java: AVG関数を実装しています。これらのクラスは/usr/hdf/current/streamline/bootstrap/udf-jars/streamline-functions-0.5.0.3.0.0.0-453.jar内にあるのですが、bootstrap-udf.shがREST APIでこのjarをPOSTする際にUUIDが与えられてstreamline-functions-UUID.jarという名前でUDFテーブルに登録されるわけですねー。
-
streamline-env.sh: IntelliJからデバッグするために、Ambariの
streamline-env templateに以下の一文を追加しましたexport STREAMLINE_HEAP_OPTS="-Xmx1G -Xms1G -agentlib:jdwp=transport=dt_socket,server=y,suspend=n,address=18000"
HDF 3.0をEC2にインストールしよう
20 Jun 2017
Hortonworks DataFlow (HDF) 3.0がリリースされました!Sandboxもダウンロード可能なのですが、使用中のマシンの容量がカツカツなので、EC2上にHDF 3.0をインストールすることにしました。この記事では、公式ドキュメントのInstalling an HDF Clusterに従ってインストールしたコマンドの履歴をまとめています。
第一章 Ambariのインストール
AMIはcentos-7.2-hvm - ami-11f8bb71を利用しました。
Spotインスタンスを使ってコスト削減します。 1台だけでなるべく安く全部まかないたいので、以下のインスタンスタイプが良さげです。 インストールには時間がかかるのでインストール時にはi3.xlargeで実行して、AMIを作っておいて、その後r3.largeで利用する予定です。
| Type | vCPU | RAM | Disk | NW | Price | Discount |
|---|---|---|---|---|---|---|
| r3.large | 2 | 15 | 1 x 32 | Moderate | $0.0262 | 86% |
| i3.xlarge | 4 | 30.5 | 1 x 950 | Up to 10 Gigabit | $0.038 | 89% |
色々とインストールするのでEBSルートデバイスのサイズを50GBに増やしときました。
インスタンスが起動したら、ローカルPCのhostsにPublic IPを記入しておきます。今後のホスト名は0.hdf.aws.mineで操作します:
sudo vi /etc/hosts
# 次のエントリを追加:
<public IP> 0.hdf.aws.mine


# 接続確認
ssh centos@0.hdf.aws.mine
パスワードレスSSH
今回は一つのサーバしか使わないので、自身にSSHログインできるようにしました。 以降の操作はEC2インスタンス上で実行します。
centosユーザで:
ssh-keygen
cat ~/.ssh/id_rsa.pub >> ~/.ssh/authorized_keys

# 確認
ssh centos@localhost
NTP
sudo yum install -y ntp
sudo systemctl enable ntpd
sudo systemctl start ntpd
Hosts
# hostに次のエントリを追加:
sudo vi /etc/hosts
<private IP> 0.hdf.aws.mine

# host名設定
sudo hostname 0.hdf.aws.mine
SELinux, umask
setenforce 0
umask 0022
sudo sh -c 'echo umask 0022 >> /etc/profile'
Ambariリポジトリをダウンロードしてインストール
sudo su -
wget -nv http://public-repo-1.hortonworks.com/ambari/centos7/2.x/updates/2.5.1.0/ambari.repo -O /etc/yum.repos.d/ambari.repo
yum install -y ambari-server
Ambari Serverのセットアップ
ambari-server setup

# ambari-serverの起動ユーザをcentosにしてみました
Customize user account for ambari-server daemon [y/n] (n)? y
Enter user account for ambari-server daemon (root):centos
Ambari Serverの起動
ambari-server start
ambari-server status

# 停止するには
ambari-server stop
第二章 データベースのインストール
Schema RegistryとStreaming Analytics Manager (SAM)でメタデータの管理に利用するRDBMSが必要です。
AmbariのインストールでインストールされるPostgreSQLは、SAMとSchema Registryが必要とする9.5以上のバージョンではないので、別途PostgreSQLかMySQLのインストールが必要となります。以下はMySQLの場合です:
yum install -y mysql-connector-java*
ambari-server setup --jdbc-db=mysql --jdbc-driver=/usr/share/java/mysql-connector-java.jar

yum localinstall -y https://dev.mysql.com/get/mysql57-community-release-el7-8.noarch.rpm
yum install -y mysql-community-server
systemctl start mysqld.service

# 自動設定された初期パスワードを取得します:
grep 'A temporary password is generated for root@localhost' \
/var/log/mysqld.log |tail -1

[root@0 ~]# grep 'A temporary password is generated for root@localhost' \
> /var/log/mysqld.log |tail -1
2017-06-20T02:02:32.825288Z 1 [Note] A temporary password is generated for root@localhost: W<5W7CRZz(js
この後、MySQLのrootパスワードを変更するのですが、デフォルトだとパスワードポリシーがきつすぎる(dev, test用には)ので、 パスワードポリシーレベルを緩めてからやった方が楽かと思います。 こちらの記事が参考になります: http://qiita.com/liubin/items/3722ab10a73154863bd4
/usr/bin/mysql_secure_installation
# 覚えやすいパスワードにしました、テスト用なので。
password
SAMとSchema Registry用のMySQL設定
mysql -u root -p

create database registry;
create database streamline;

CREATE USER 'registry'@'%' IDENTIFIED BY 'password';
CREATE USER 'streamline'@'%' IDENTIFIED BY 'password';

GRANT ALL PRIVILEGES ON registry.* TO 'registry'@'%' WITH GRANT OPTION;
GRANT ALL PRIVILEGES ON streamline.* TO 'streamline'@'%' WITH GRANT OPTION;

commit;
DruidとSuperset用のMySQL設定
DruidとSupersetのユーザも作成しましたが、HDFにはDruidが同梱されていないので、スキップしても良いですね。
mysql -u root -p

CREATE DATABASE druid DEFAULT CHARACTER SET utf8;
CREATE DATABASE superset DEFAULT CHARACTER SET utf8;

CREATE USER 'druid'@'%' IDENTIFIED BY 'password';
CREATE USER 'superset'@'%' IDENTIFIED BY 'password';

GRANT ALL PRIVILEGES ON *.* TO 'druid'@'%' WITH GRANT OPTION;
GRANT ALL PRIVILEGES ON *.* TO 'superset'@'%' WITH GRANT OPTION;
commit;
第三章 HDF Management Packのインストール
ambari-server stop

wget http://public-repo-1.hortonworks.com/HDF/centos6/3.x/updates/3.0.0.0/tars/hdf_ambari_mp/hdf-ambari-mpack-3.0.0.0-453.tar.gz

sudo ambari-server install-mpack \
--mpack=hdf-ambari-mpack-3.0.0.0-453.tar.gz \
--verbose

ambari-server start
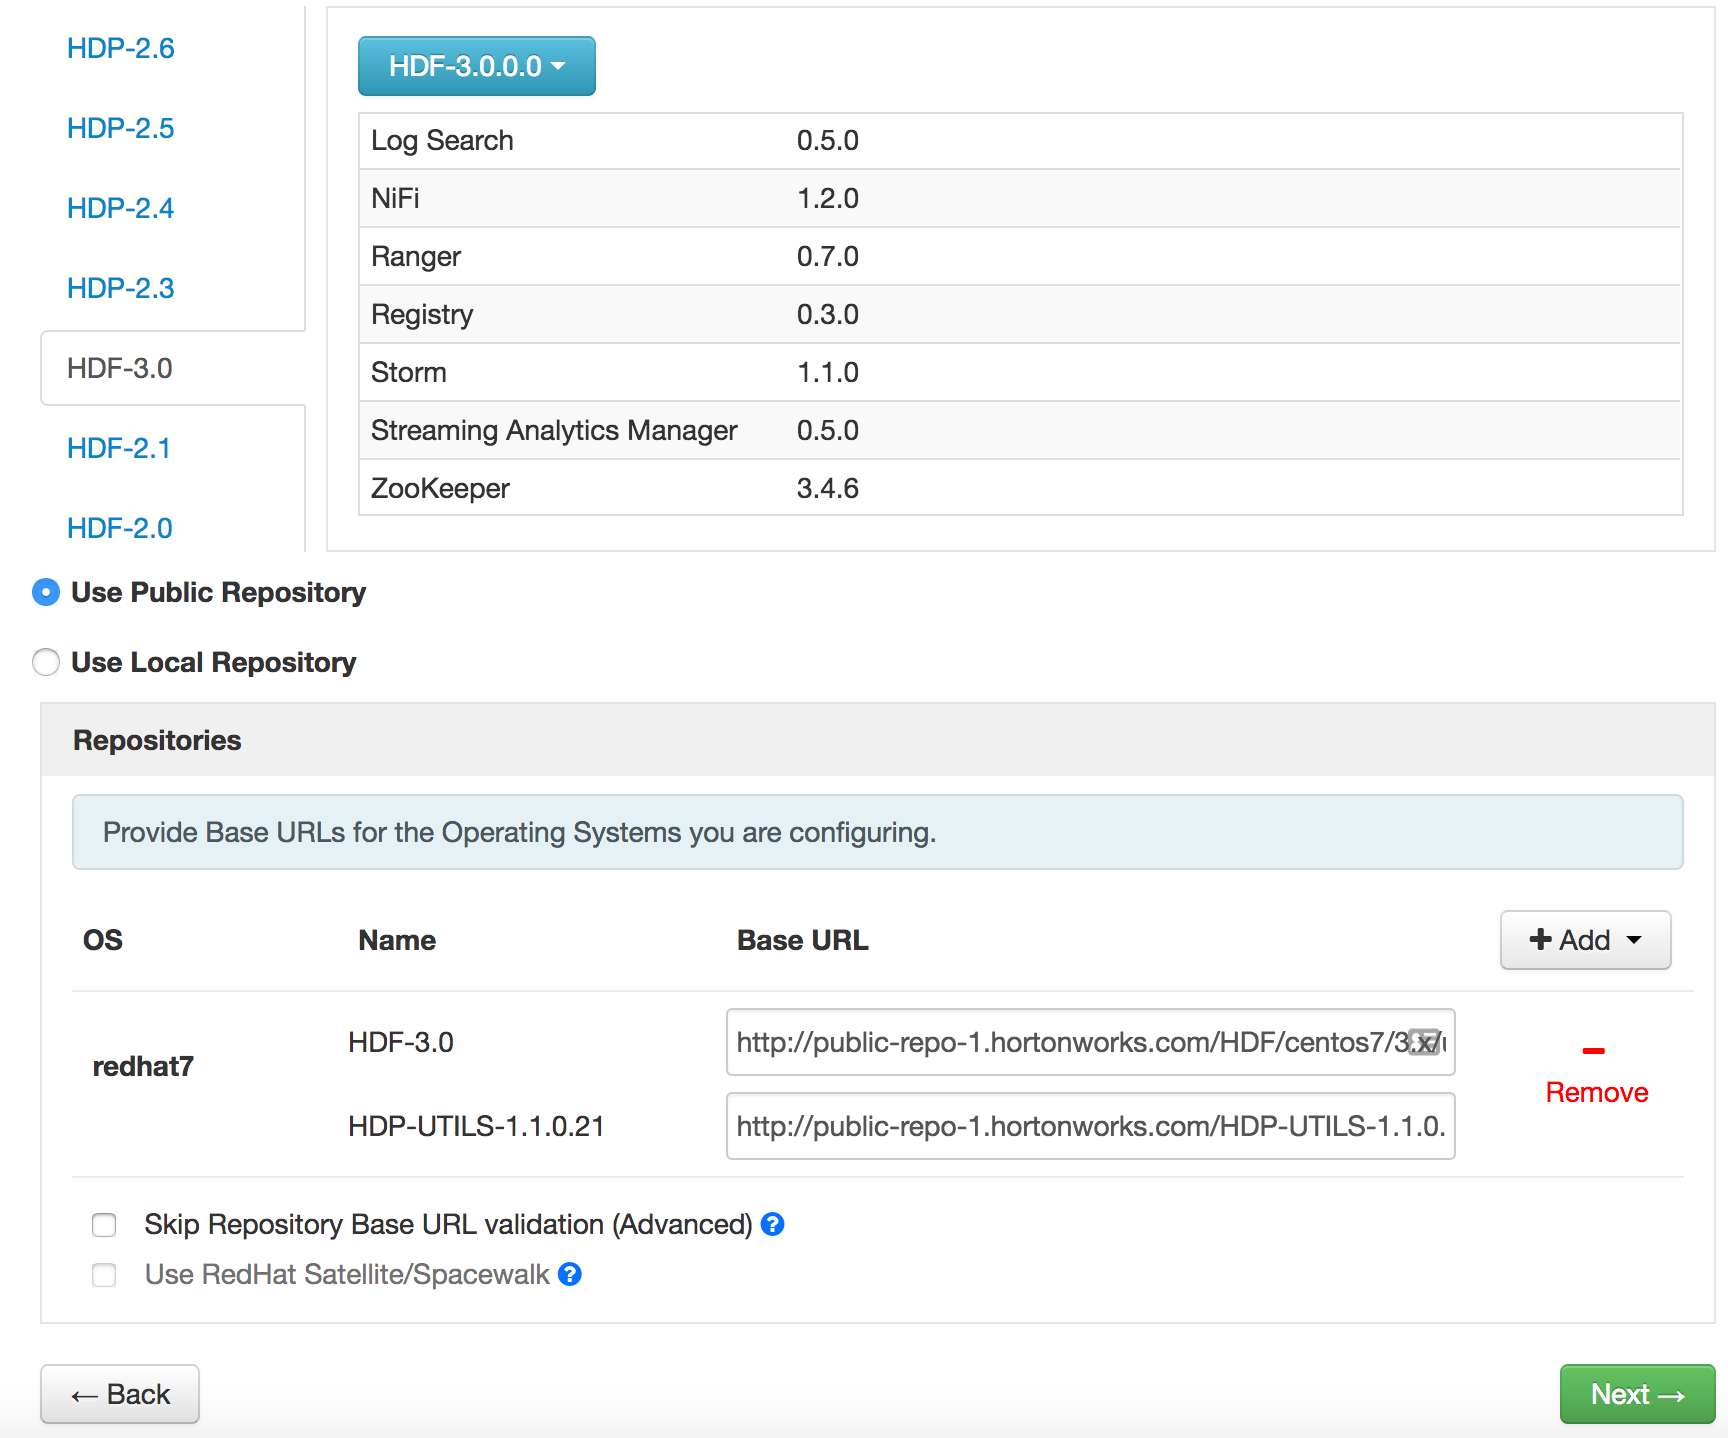
第4章 AmbariからHDFクラスタをインストール
http://0.hdf.aws.mineから、Ambariにログインします。
初期ユーザ名/パスワードは: admin/admin
‘Launch Install Wizard’をクリックして、インストールを進めます。
うーん、HDFを選ぶべきか迷ってしまいました。なぜなら、DruidとSuper Setも含めたストリーミング処理結果の可視化まで試したいのですが、HDFにはDruidとSupersetは入っていません。とりあえず、HDFで進みます。
Private Keyはcentosユーザのものをcat ~/.ssh/id_rsaで出力してコピペ:
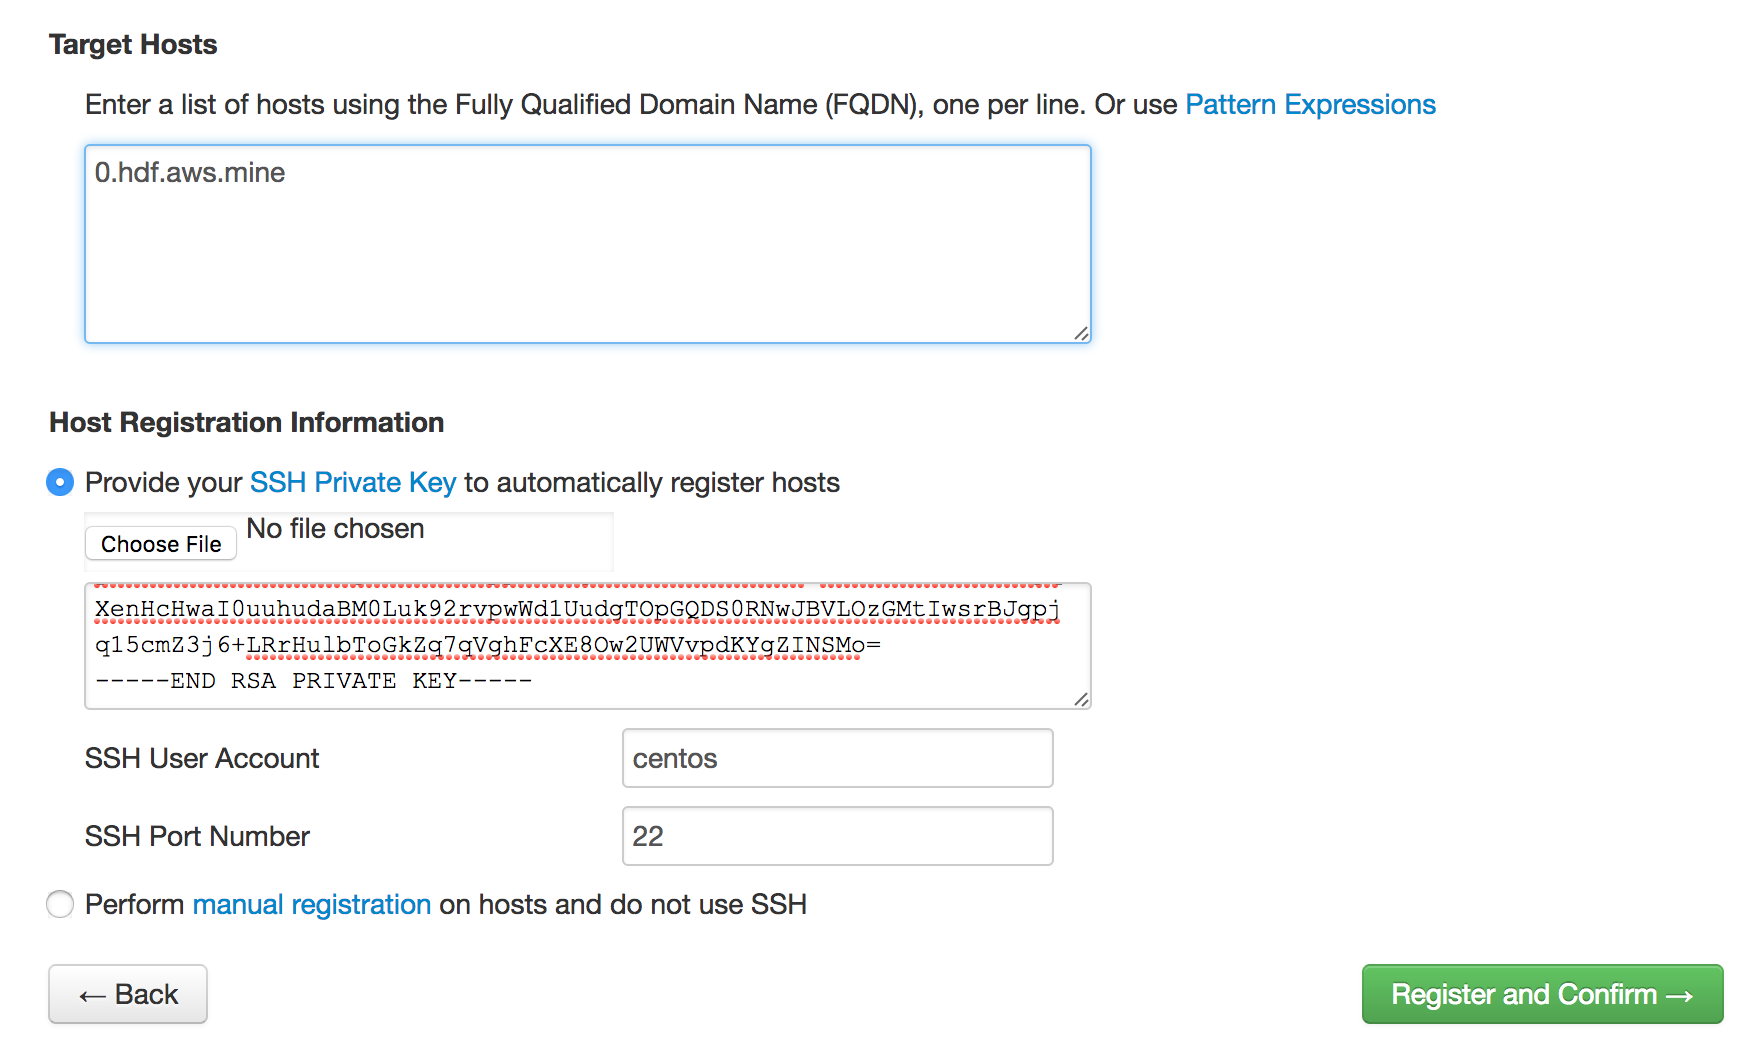
各コンポーネントで必要なパスワードを設定します。
基本、忘れないように全部passwordにしました。テスト用なので。
NiFiのEncrypt Configuration Master Key Password, Sensitive property values encryption passwordは最低12文字必要なので、
passwordpasswordを指定しました。
nifi.toolkit.tls.tokenも設定する必要があるので、適当な文字列、NiFiCATokenを設定しました。
3つほどHeapサイズの警告が残りますが、Proceedで次へ。
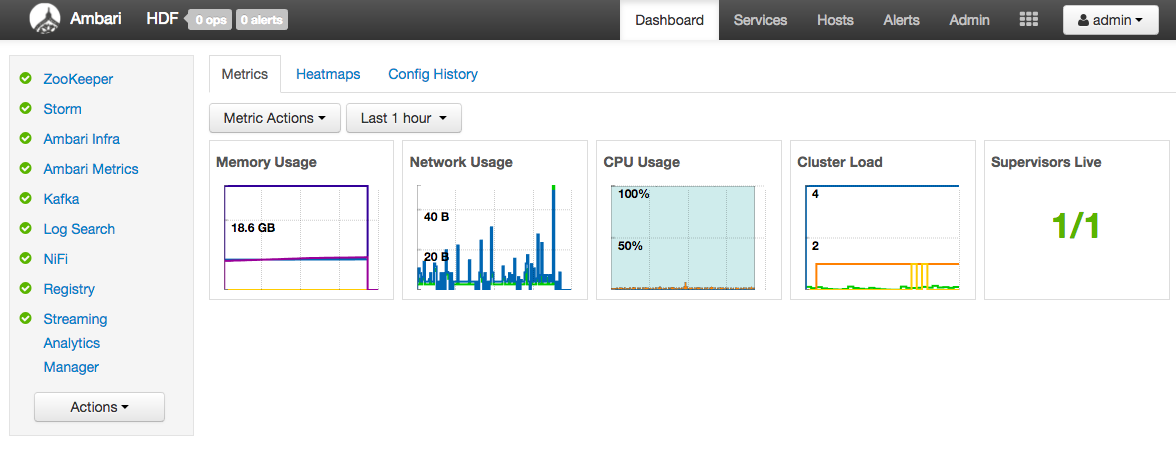
これで、単一ノードのHDFクラスタの出来上がりです:)
How to wait for all fragments to be processed, then do something?
02 Feb 2017
I knew that MergeContent has ‘Defragment’ Merge Strategy, and with that, we can merge fragments those are split by Split processors (e.g. SplitText) back to a single flow file. However, sometimes things can be more complicated than that. This post describes the recent improvement that I worked on, to wait for all fragments to be processed.
Why MergeContent don’t suffice
It’s very common flow to design with NiFi, that uses Split processor to split a flow file into fragments, then do some processing such as filtering, schema conversion or data enrichment, and after these data processing, you may want to merge those fragments back into a single flow file, then put it to somewhere.
MergeContent can be used for that purpose, but sometimes it won’t be able to merge or wait, in following situations:
- The number of fragments differ from the original. This happens if some of the fragments have been filtered out.
- The number of fragments need to be merged can’t fit in a incoming queue. This happens if there’re more flow files than configured back pressure object threshold for that queue. In this case, some fragments can’t be enqueued, thus MergeContent can’t merge and remove queued flow files, so required fragments can’t be enqueued, a kind of dead-lock situation.
- Using MergeContent ‘Correlation Attribute Name’ might work, but it’s possible to produce multiple result flow files, and you won’t be able to know which one is the last
- The best practice for Split processors is to use two phase splitting. First, split a file into mid-sized chunks, then split a chunk into individual record. This way, we can prevent NiFi to produce a lerge amount of flow file which can cause OutOfMemory error. Also, this makes it difficult to merge it back again, as the second Split overwrites flow file attributes such as ‘fragment.identifier’ and ‘fragment.count’. We can copy those to avoid being overwritten, but flow looks messy if we actually do that.
Alternative Solution, Wait/Notify
We need something that overcome issues described above, and Wait/Notify processors can be the one.
I designed NiFi flow as follows. There are 4 areas in this flow and it looks like a traditional nested for loop using i and j:
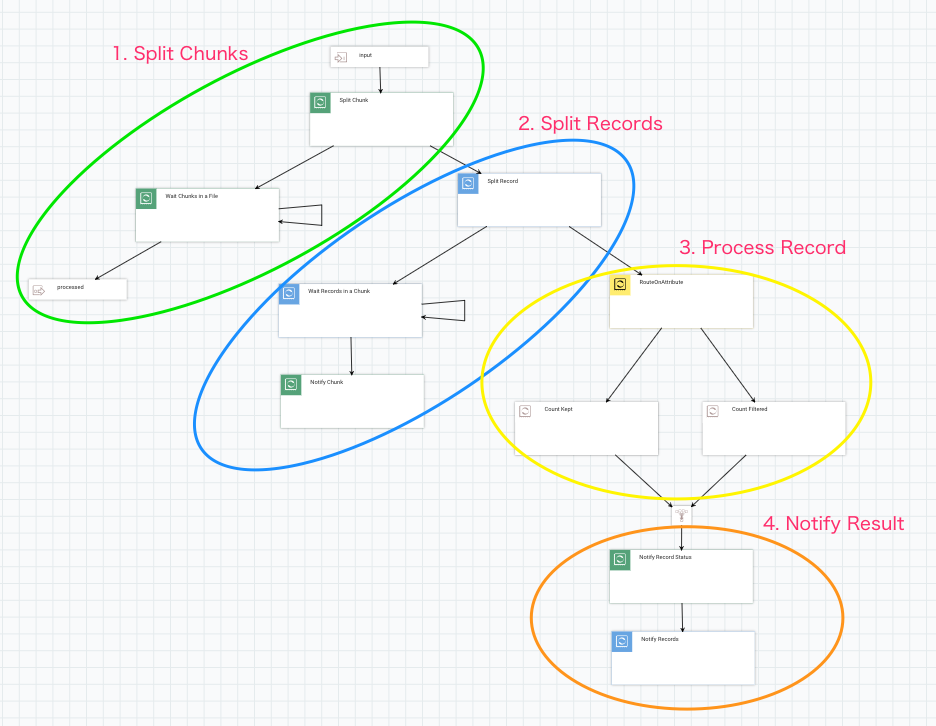
Let’s look at each area closer.
1. Split a file into Chunks
I split into 5,000 lines chunks here. Then connect the original relationship into a Wait processor.
Here is a list of important Wait processor configurations:
- Release Signal Identifier =
${filename}: it needs to wait for all chunks to be processed, so filename would be legitimate for a signal id. - Target Signal Count =
${fragment.count}: The attribute is set by SplitText processor. - Signal Counter Name =
chunks: I wanted to count how many records are actually processed, or filtered out. So I used specific counter name here so that those don’t mix.
When Wait processor finds chunks counter reached to fragment.count, the original flow file is passed to the processed output port.

2. Split a Chunk into Records
Each chunk is passed into another SplitText here, then it produces flow file per individual record.
Similar to the previous part, connect original to a Wait processor, which is configured as follows:
- Release Signal Identifier =
${fragment.identifier}: When SplitText splits a flow file into fragments, it publishes UUID and assign it to fragment.identifier attribute, outgoing flow files those are derived from the same original input flow file will have the same fragment.identifier. In this example, it is assigned per Chunk. - Target Signal Count =
${fragment.count}
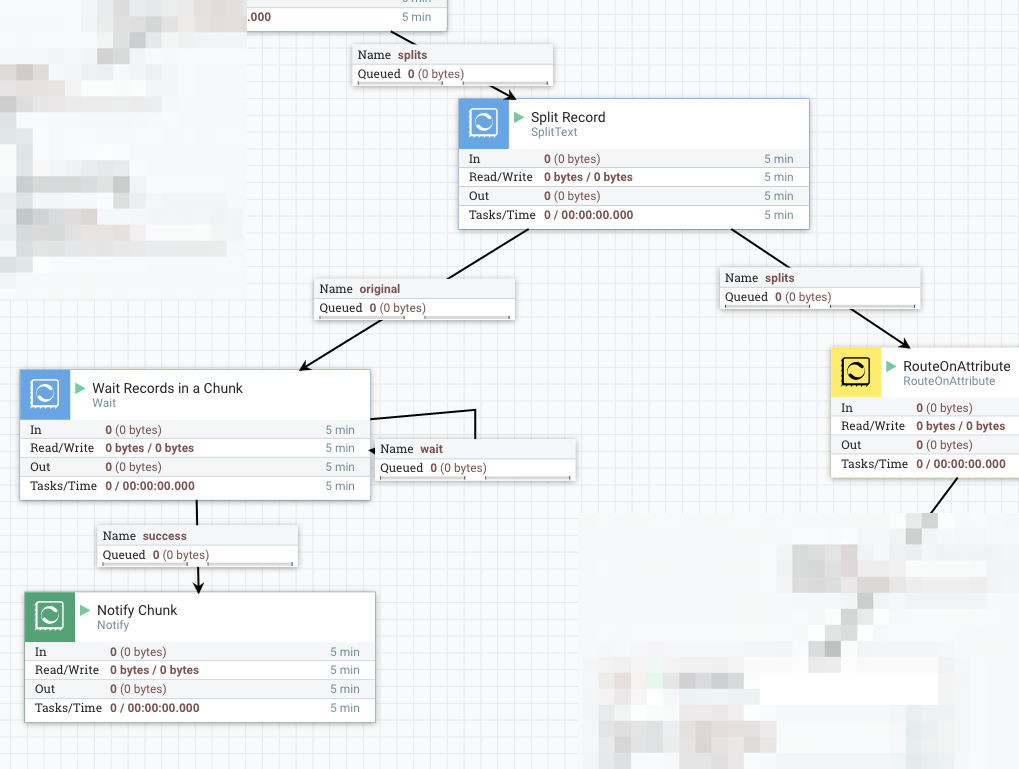
When Wait finds all Records in a Chunk has notified, it passes the flow file to Notify which notifies to the corresponding Wait processor in the previous part.
- Release Signal Identifier =
${filename}: same as the corresponding Wait processor. - Signal Counter Name =
chunks - Signal Counter Delta =
1
3. Process Record
In this area, you can do whatever record level processing, such as filter, convert, enrich or call APIs … etc.
To make it as simple as possible, I just route records into two groups, kept and filtered, by RouteOnAttribute:
- Add a dynamic property
filteredwith value as${fragment.index:mod(2):equals(1)}: this routes the half of data to filtered relationship
The next processor in both routes is UpdateAttribute, which adds counter.name attribute with kept or filtered as its value.

4. Notify Record processing result
At the last part, I used two Notify processors.
The first (green) one is used for adding Record process result counter into the signal that the root Wait processor is waiting for, so that downstream processing can use those counts.
- Release Signal Identifier =
${filename} - Signal Counter Name =
records.${counter.name}: use an attribute which is set by the previous part. NOTE: this counter is not conductive for the Wait processor to wait, rather just an additional indicator showing how processing went. - Signal Counter Delta =
1 - Signal Buffer Count =
20000: This is critical for performance, as this processor receives record level flow files. Updating underlying cache engine each time wouldn’t provide good performance. So let’s buffer a lot.

The final Notify processor notifies that records are processed, and configured like below:
- Release Signal Identifier =
${fragmnet.identifier}: Meant to notify the Wait processor which waits for Chunks. - Signal Counter Name =
${counter.name} - Signal Counter Delta =
1 - Signal Buffer Count =
20000
If everything is set up correctly, when files are passed to the input port, it will be split into chunks first, then records, and all records and chunks are processed, the original input file is routed to the output port. As another benefit of this approach, the outgoing flow file has following attributes added (result of a file with 1M lines):
- wait.start.timestamp = 1486023148194
- wait.counter.chunks = 200
- wait.counter.records.kept = 500000
- wait.counter.records.filtered 500000
How fast is it?
It works as expected in terms of functionality, but how about performance? Obviously it can’t be faster than a flow only does Split -> Split -> RouteOnAttribute. But I’d like to see it works as close as the simple flow does. So, conducted following test.
- Single, standalone NiFi, 1.2.0-SNAPSHOT
- Input file: a text file, uncompressed, containing 1,000,000 lines, 955MB in file size
- Each line has 1,000 characters
- nifi.provenance.repository.implementation=org.apache.nifi.provenance.VolatileProvenanceRepository
Without Wait/Notify processors, the flow finished about 1 minute. That is about 16666 events/sec, 15.91 MB/sec. With Wait/Notify processors, it took about 2 minutes, 8333 events/sec, 7.95 MB/sec.
It’s about two times slower than a flow that only splits and processes.
Summary
Of course it taks longer to complete, waiting asynchronous operations tends to be like that. However, by sacrificing performance a bit, you can design a NiFi flow that tracks record level processing result status, and keep processing order more strictly.
If your use case doesn’t require to wait for something, then just move forward, that’d be the best. But if you do, this approach using Wait/Notify would be helpful.
NOTE: this post contains improvements that is not merged into NiFi master yet, but available as a PR for NIFI-3431: Support batch update in Notify processor.
Template file is available on Gist.
How to send file from localhost to AWS EC2 using NiFi Site-to-Site?
27 Jan 2017
This post describes how to use NiFi Site-to-Site protocol to transfer data from localhost to a remote NiFi instance running on an AWS EC2.
Let’s make it cheap
As a NiFi developer, there’s demand to create various environment, not only NiFi, but also databases, search engines, Hadoop, web servers, proxies … etc. VM and Docker containers are handy but sometimes I need to create environment at lower level to investigate certain type of issues.
These temporaly server instances should be less expensive, so that I can experiment different environments with more try and error processes. EC2 Spot instance is the best thing for this need.
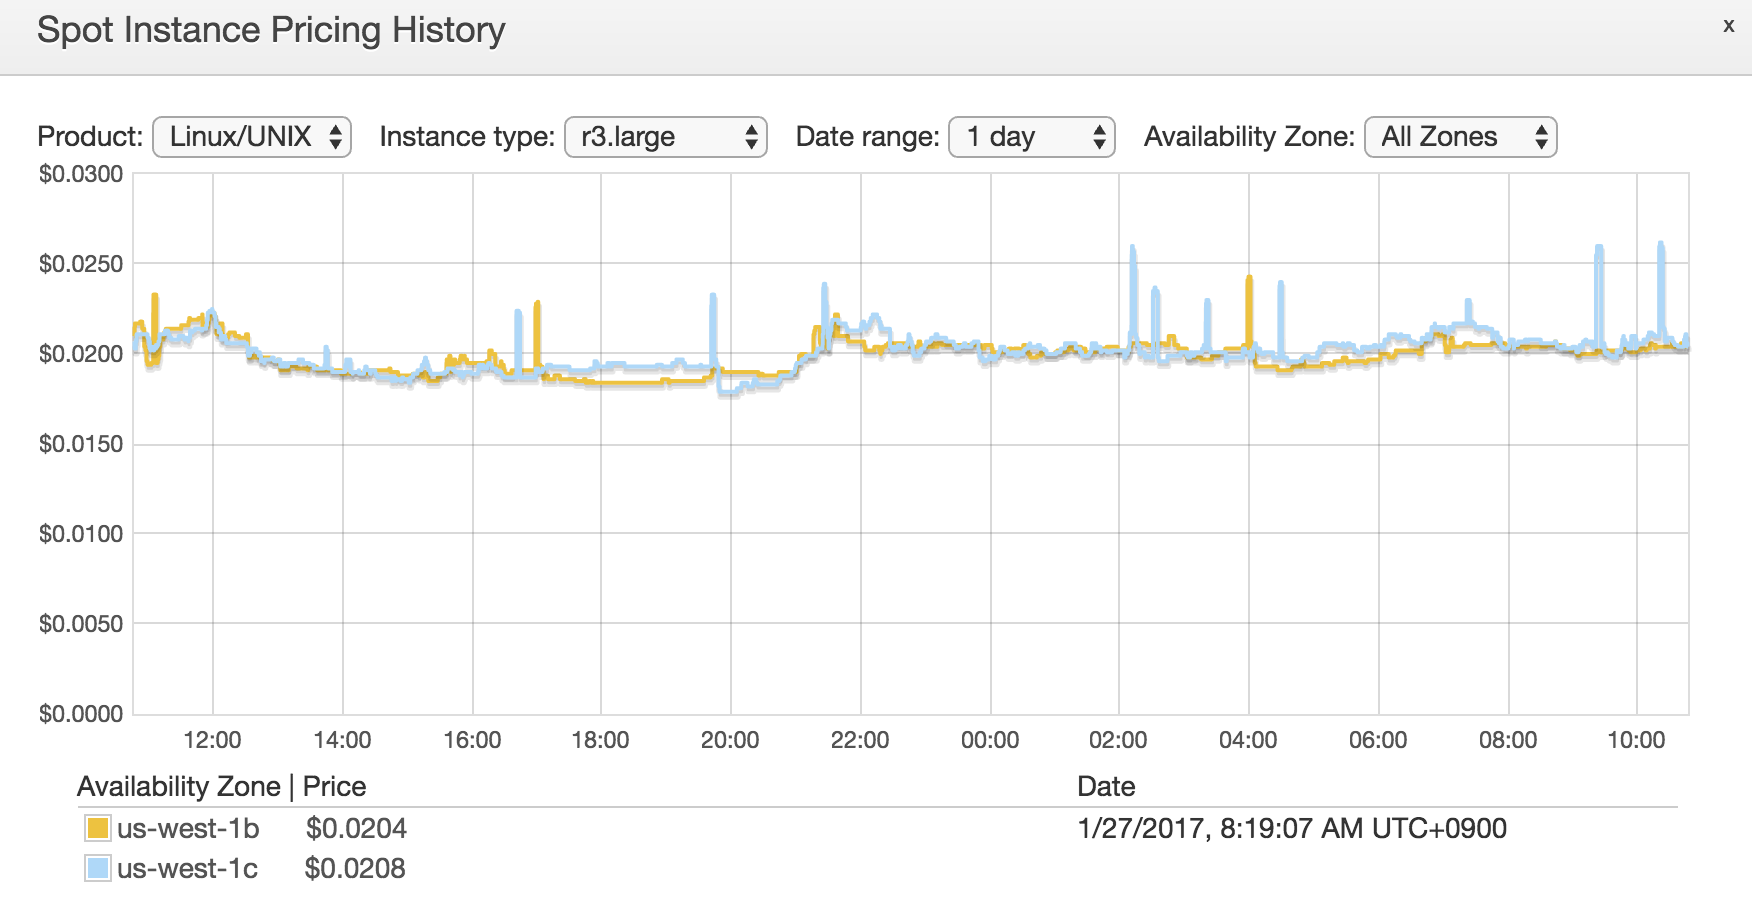
For example, r3.large (which is cost effective one, for NiFi, I think) is just less than $0.025/hour! Just 2 JPY/h!
Let’s make it secure
Even though it’s not a production environment, I want it to be secure with least effort.
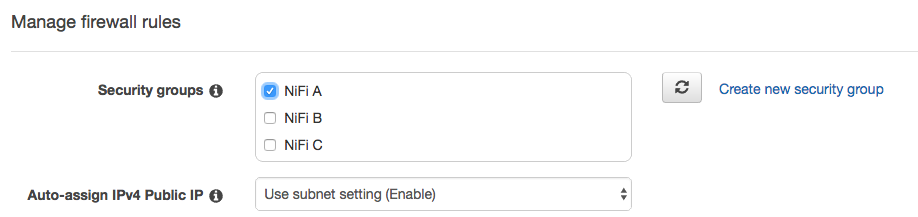
Security Group can restrict access to specific port, and it has My Ip option for source IP.
Let’s make one for NiFi so that I can send file from localhost to a EC2 instance over Site-to-Site protocol, only from the ip address that I’m using.
First, go to AWS console:
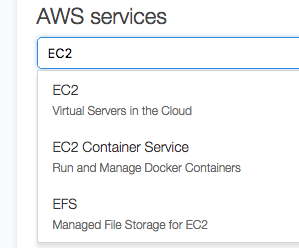
Then select Security Groups from the left pane, and create security group. Let’s open port 22 for SSH access, and 8080 for HTTP which is used to access NiFi web UI and also Site-to-Site protocol. Restrict access from My IP:
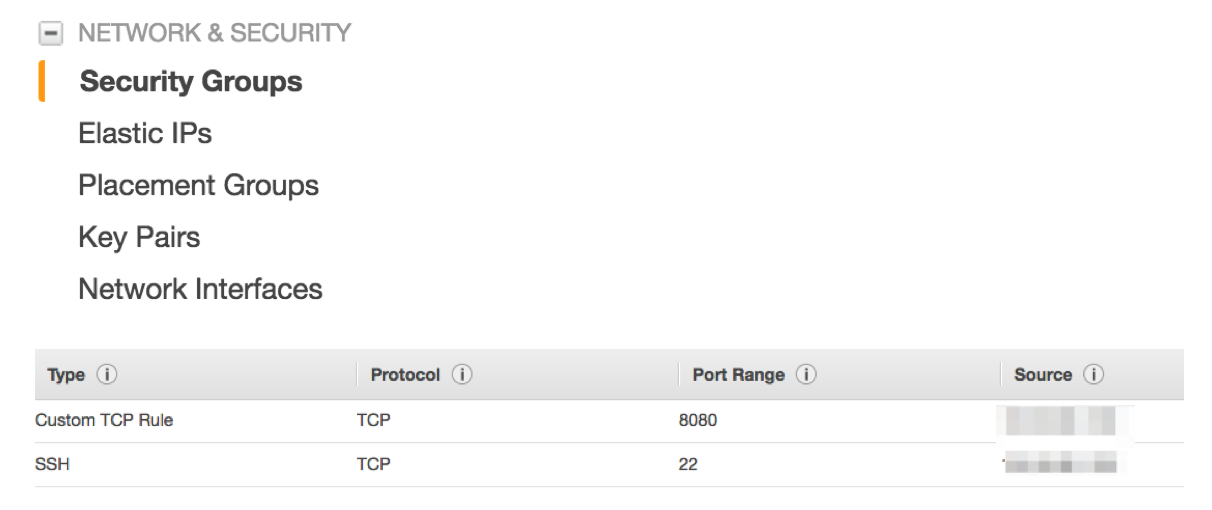
For this example, security group is the only security mechanism that I used, but NiFi has built in AuthN and AuthZ features. Please check NiFi, Authentication and Authorization if you’re interested in more detail.
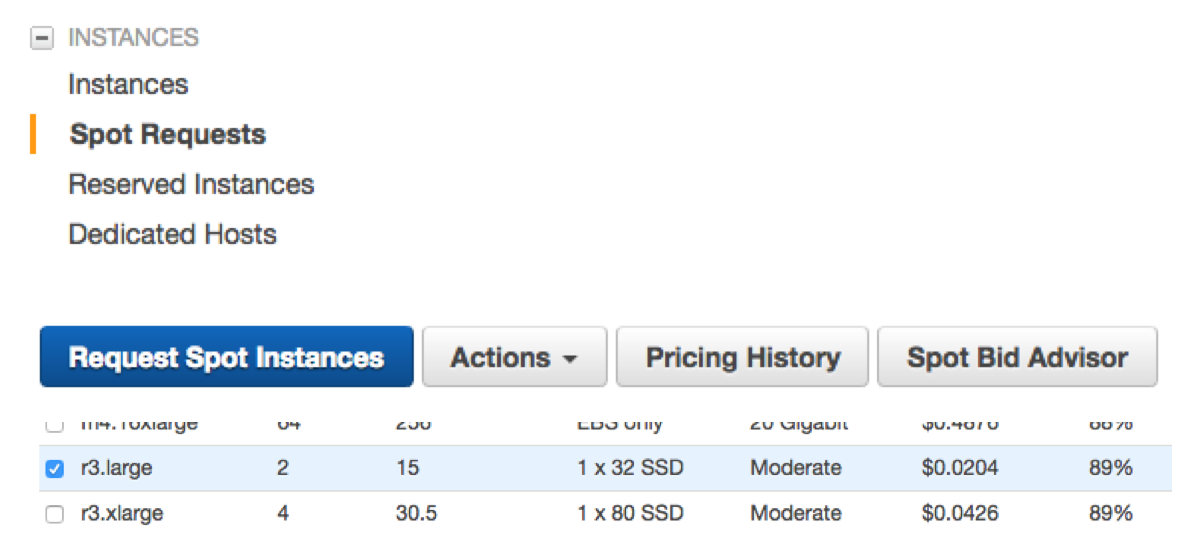
Create Spot request
Next, let’s create a Spot request. r3.large has 2 cores and 15 GB of RAM, so it’s good for moderate NiFi workload.
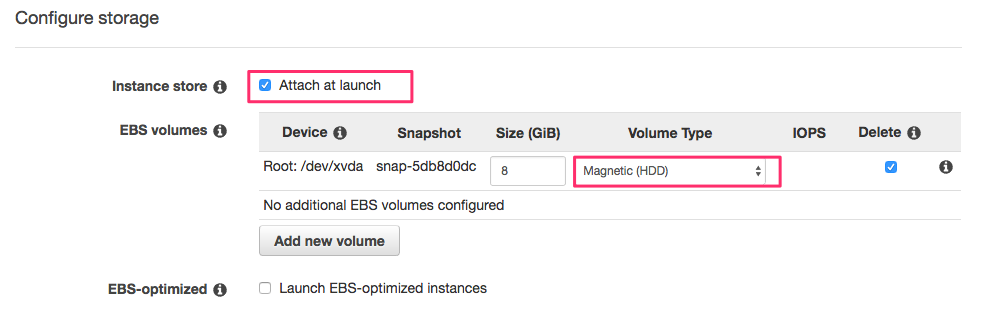
When configuring storage, don’t forget to enable Attach at launch. Selecting HDD can be cheaper, as I’m going to install NiFi on the instance store, I don’t need SSD for the root device.
A key pair needs to be specified. This key is needed for SSH login.
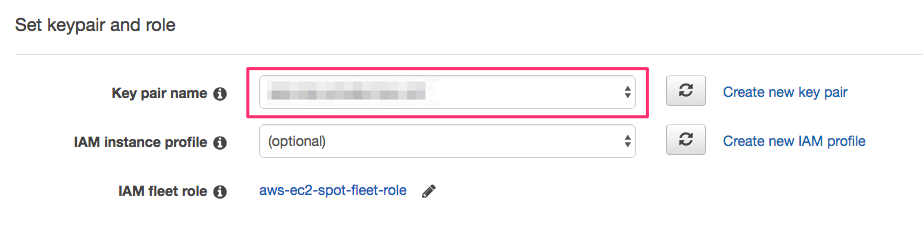
Let’s choose a Security group that I created earlier (port 22 and 8080 are open). I have few security groups, for deploying multiple NiFi clusters communicating with each other with different situations.
At the end of the wizard, Spot request summary looks like this:
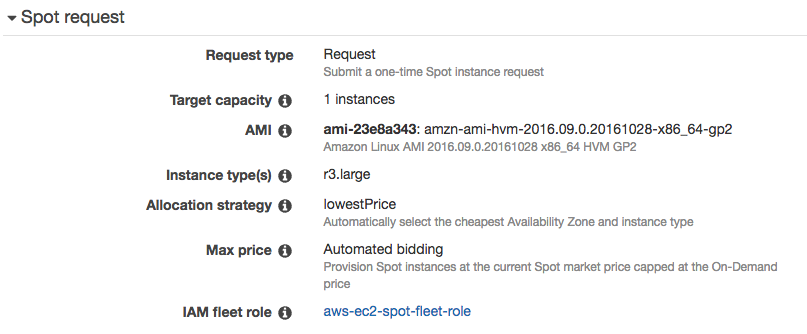
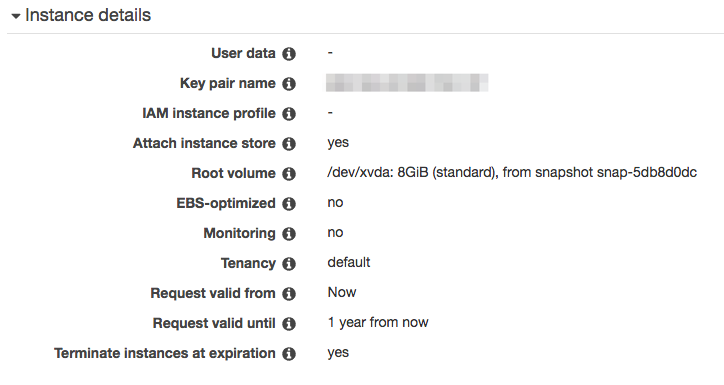
Submit the request and wait for few minutes then it will be ready! Using AWS CLI tool makes it’s easy to recreate the same request.
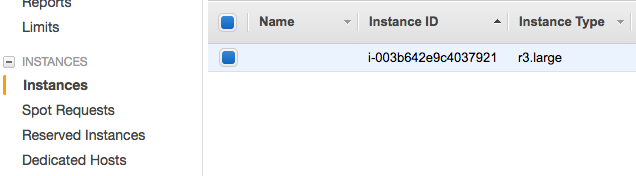
Setup EC2 instance
Once the EC2 instance is ready, let’s get its public IP needed to SSH. It can be seen from here:
Then, let’s add the IP address to hosts file on localhost. Using consistent naming rule would make your daily life easier.
E.g: <id>.<service>.<location>.mine, in this case, a.nifi.aws.mine.
After logged into the server instance, let’s install Java 8.
Installing Java 8
NiFi 1.0 or later requires Java 8:
$ ssh ec2-user@a.nifi.aws.mine
$ sudo su -
$ yum install -y java-1.8.0-openjdk
# Choose 1.8
$ alternatives --config java
Mount instance store
The instance store have to be mount manually, details are written in AWS document, but in short:
# Find out block device
$ lsblk
# Create file system
$ mkfs -t ext4 /dev/xvdca
# Mout the instance store
$ mount /dev/xvdca /mnt
Install NiFi
Let’s install NiFi on the instance store:
$ cd /mnt
$ wget http://www-us.apache.org/dist/nifi/1.1.1/nifi-1.1.1-bin.tar.gz
$ tar xvf nifi-1.1.1-bin.tar.gz
$ cd nifi-1.1.1

# Edit configuration
$ vi conf/nifi.properties
The only configuration needs to be edit is nifi.remote.input.host.
Configure it with a hostname which is accessible from localhost.
Without specifying nifi.remote.input.host, NiFi will introduce it to Site-to-Site client as ‘localhost’ or the one hostname command returns.
On EC2, that will be something like ip-172-31-9-89, and it’s not accessible from other network.
So, we need to specify hostname to make Site-to-Site work across different networks.
# Site to Site properties
nifi.remote.input.host=a.nifi.aws.mine
nifi.remote.input.secure=false
nifi.remote.input.socket.port=
nifi.remote.input.http.enabled=true
nifi.remote.input.http.transaction.ttl=30 sec
Once these settings are done, let’s start NiFi:
$ ./bin/nifi.sh restart
Similarly, install NiFi on localhost, too. It’s just downloading the binary, extract it, then run nifi.sh.
Connect Localhost and Cloud using NiFi
Create remote NiFi flow
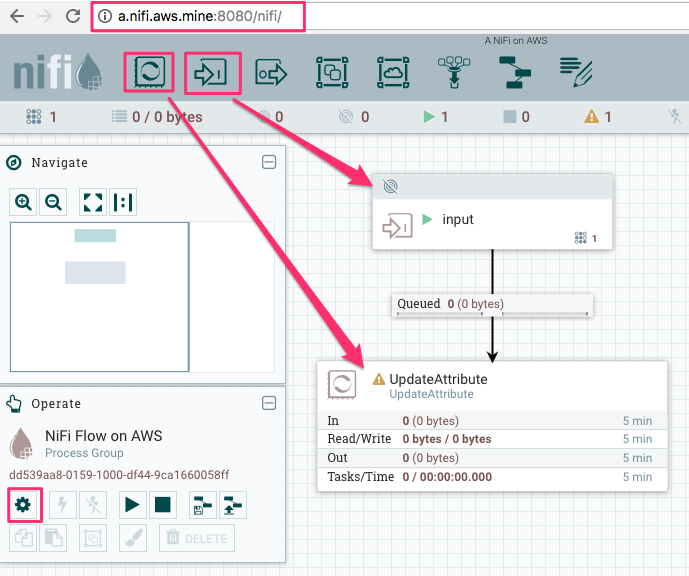
As I opened the port 8080 at EC2 security group, and add the instance public IP to hosts file on localhost, I can access Web UI of NiFi running on EC2 from localhost browser.
You can change the name of NiFi flow from the gear icon at the left bottom of the screenshot. Let’s deploy an Input port passing incoming flow files to UpdateAttribute. This UpdateAttribute processor is there just for queueing flow files up to debug.
Create local NiFi flow
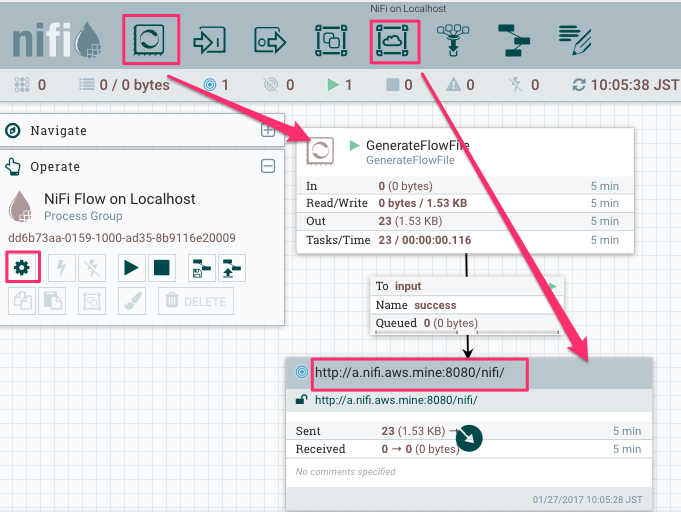
Let’s use GenerateFlowFile as always. It becomes more handy since it supports Custom Text property so that users can
specify text content to generate flow file with. I set Run Schedule to 5 sec to keep my network bandwidth usage low.
Then deploy a Remote Process Group (RPG), and set Transport Protocol to HTTP, and URLs to remote NiFi’s URL,
which is the same one you’d use to view the UI of remote NiFi from browser.
It may take few seconds for the RPG to get the remote NiFi’s topology and available port information. Once those information is ready, we can connect relationship from other processors. Connect GenerateFlowFile to input port.
Then right click the RPG and select Enable Transmission.
Start GenerateFlowFile as well, then those are sent to the remote NiFi running on EC2!
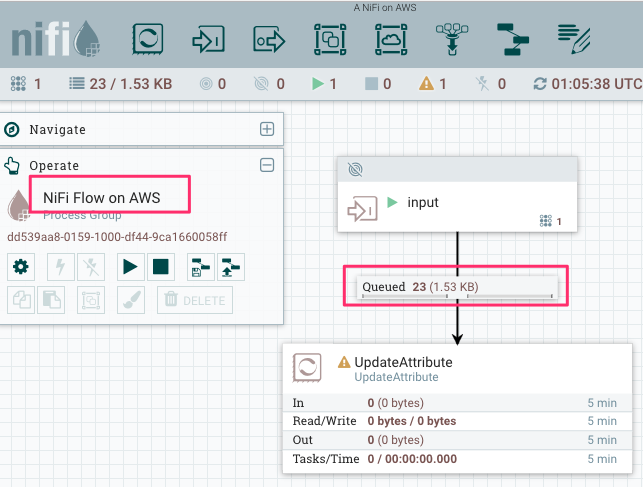
On remote NiFi UI, flow files received via the input port can be seen in the queue:
When local NiFi can not communicate with remote NiFi
In this post, I wrote up steps needed for two NiFis on local and EC2 communicate with each other. But for users who have issues with making it work as expected, here is a list of things to check:
- EC2 Security Group: for other NiFi to connect via Site-to-Site, the port configured with
nifi.web.http.port(defaults to 8080) on the remote NiFi needs to be opened if RPG is configured to useHTTPas transport protocol. - Likewise, for
RAW, the port configured withnifi.remote.input.socket.porton the remote should be opened. Since additional port needs to be opened, HTTP is recommended over RAW protocol in this case. - The URLs in RPG is the same remote NiFi URL, which you’d use to access remote NiFi UI from a browser.
- Input Port or Output Port should be started to receive Site-to-Site client access.
- Is the remote hostname is accessible from client machine? This can be checked with following cURL command:
$ curl -H 'x-nifi-site-to-site-protocol-version: 1' 'http://a.nifi.aws.mine:8080/nifi-api/site-to-site/peers'
This would return:
{"peers":[{"hostname":"ip-172-31-9-89","port":8080,"secure":false,"flowFileCount":0}]}
This REST endpoint is used from Site-to-Site client, to determine remote NiFi cluster topology.
Please check hostname and port in peers in the response. Is it accessible from client machine? Site-to-Site client can see available port lists, but won’t be able to make transaction to send data if this hostname and port are not accessible.
You already know where to configure to fix this? Very well, you are a good reader!
Summary
In this post, I described how to use EC2 spot instance to minimize cost for experimentations, and how to configure remote and local NiFi instance to transfer data.
NiFi Site-to-Site can be used not only for sending data from local to cloud, but also receiving data from remote to local, or sending from multiple local machines … etc.
Thanks for reading, please let us know if you encountered any issue with NiFi, from NiFi users mailing list!
NiFi, JoltTransformJSON jolted me
22 Nov 2016
Recently, a question was posted on NiFi user mailing list about how to transform a JSON into a desired format. I tried to answer the question using JoltJsonTransform processor. However it was not an easy process for me to figure out what Jolt spec will do the expected transformation. Eventually, I understood how it works, and feel I should share it.
Sample input and expected JSONs were shared as follows. As you can see, it requires join operation on elements in the root array by the value of ID:
[
  { "ID": "100",
    "PersonalDetails": [
      { "name": "leo",
        "age": "30",
        "address": "Us" }
    ] },
  { "ID": "100",
    "OfficeDetails": [
      { "Company": "lys",
        "salary": "2000",
        "designation": "manager" }
    ] },
  { "ID": "101",
    "PersonalDetails": [
      { "name": "karo",
        "age": "24",
        "address": "Newyork" }
    ] },
  { "ID": "101",
    "OfficeDetails": [
      { "Company": "lys",
        "salary": "1000",
        "designation": "Operator" }
    ] }
][
{
"ID": "100",
"OfficeDetails": [
{ "Company": "lys",
"salary": "2000",
"designation": "manager" }
],
"PersonalDetails": [
{ "name": "leo",
"age": "30",
"address": "Us" }
] },
{
"ID": "101",
"OfficeDetails": [
{ "Company": "lys",
"salary": "1000",
"designation": "Operator" }
],
"PersonalDetails": [
{ "name": "karo",
"age": "24",
"address": "Newyork" }
] }
]Here is the Jolt spec I came up with, to do the transformation:
[
  {
    "operation": "shift",
    "spec": {
      "*": {
        "PersonalDetails": "@(1,ID).PersonalDetails",
        "OfficeDetails": "@(1,ID).OfficeDetails"
      }
    }
  },
  {
    "operation": "shift",
    "spec": {
      "*": {
        "$": "[#2].ID",
        "@.OfficeDetails": "[#2].OfficeDetails",
        "@.PersonalDetails": "[#2].PersonalDetails"
      }
    }
  }
]
Let me try to explain how it works. There are two shift operations, the first one does followings:
- Jolt will traverse elements in the input object, if there is a matching spec, then apply it to write it into the output JSON
- The first
*matches each element in the root array -
Then
PersonalDetailsmatches PersonalDetails element within the element hit at previous step, and execute the mystical@(1,ID).PersonalDetails. If I explain it with plain English, it may goes like:Copy the value of input PersonalDetails element (which is an array) to the output PersonalDetails element, as a child of an element which is one of the root output element, named with the value of ID attribute that exists one level up in the input JSON.
- Do the same thing with OfficeDetails as PersonalDetails
Wow, in just a simple instruction like that, so many things are going on! After the first shift operation, the intermediate JSON will look like the left intermediate JSON below. Elements are joined by ID already.
{

  "100": {
    "OfficeDetails": [
      { "Company": "lys",
        "designation": "manager",
        "salary": "2000" } ],
    "PersonalDetails": [
      { "address": "Us",
        "age": "30",
        "name": "leo" } ]
  },
  "101": {
    "OfficeDetails": [
      { "Company": "lys",
        "designation": "Operator",
        "salary": "1000" } ],
    "PersonalDetails": [
      { "address": "Newyork",
        "age": "24",
        "name": "karo" } ]
  }

}[ {
"ID": "100",
"OfficeDetails": [
{ "Company": "lys",
"salary": "2000",
"designation": "manager" }
],
"PersonalDetails": [
{ "name": "leo",
"age": "30",
"address": "Us" }
] },
{
"ID": "101",
"OfficeDetails": [
{ "Company": "lys",
"salary": "1000",
"designation": "Operator" }
],
"PersonalDetails": [
{ "name": "karo",
"age": "24",
"address": "Newyork" }
] } ]There are still two differences from the expected output, the root object should be an array, and the ID should be an attribute rather than object key. Now, let’s see how the second shift operation works. The second shift operation looked like this:
{"*": {
    "$": "[#2].ID",
    "@.OfficeDetails": "[#2].OfficeDetails",
    "@.PersonalDetails": "[#2].PersonalDetails"
}}- The first
*matches with each key/value pair in the root object -
$matches with the key (i.e. “100” and “101”), then copy it to[#2].OfficeDetails. What does it mean? Again with plain English:Make the output root object an array. Copy the captured key as ‘ID’ attribute in the output object within the output root array.
@.OfficeDetailsmatches with the OfficeDetails element in the value. Copy it to the output object OfficeDetails.- Do the same thing with PersonalDetails.
I came up with more complex Jolt spec using three shift operations to do the same thing at first (you can see it in the ML thread), but it can be this simple in the end.
There are so many examples at the bottom of Jolt Transform Demo web page, and you should definitely check it before writing complex Jolt spec.
Hope this helps, see you next time!
NiFi, Authentication and Authorization
15 Nov 2016
Today, I’d like to write about NiFi auth. Auth is an ambiguous word, specifically, Authentication (AuthN) and Authorization (AuthZ). AuthN is a process to identify who they are. AuthZ is a process to allow what they can. So, AuthN should always happen before AuthZ. Let’s see how NiFi handles AuthN and AuthZ!
Most of readers probably knows, but NiFi’s AuthZ and AuthN are only enabled when you secure your NiFi installation (HTTPS).
AuthN
In NiFi, the primary method to identify who made the request is Client Certificate. When a secured NiFi receives a request, it first checks whether a client certificate is provided. If so, it checks if the certificate is trustworthy. Then extracts Distinguished Name (DN) to use it as NiFi user identifier.
When a request doesn’t contain a client certificate, NiFi lets a LoginIdentityProvider to identify the user. Currently, NiFi supports two LoginIdentityProvider implementation, those are LdapProvider and KerberosProvider.
AuthZ
Once NiFi successfully identifies a user submitted the request, it authorize whether the user can perform that request. Note that at this point, the mechanism used to identify the user becomes irrelevant to AuthZ the request.
NiFi has a way to do this out of the box, it provides a way to define Policies to allow users/groups performing certain actions on specific resources. You can use NiFi Web UI to configure those policies. (Access Policy Configuration Examples)
If you’d like to authorize the requests more centalized way, like control AuthZ among other Hadoop eco-system such as HDFS or Kafka, then RangerNiFiAuthorizer would be the way to go. (Here is a great post by Bryan Bende, Using the Apache Ranger Authorizer)
Different occasions NiFi authn/authz requests
Let’s look at some scenarios in which a client and NiFi perform auth processes.
- An user has installed his/her client certificate into a web browser (or OS keychain). When they access NiFi Web UI, the certificate is used. NiFi extract DN from the certificate, and AuthN the request with the DN. Then AuthZ the request.
- An user accesses NiFi Web UI. However, he/she doesn’t have a client certificate configured. NiFi respond with a login screen, the user input their username and password. NiFi AuthN the request, using an imprementation of LoginIdentityProvider (LDAP or Kerberos). After the request is AuthNed, then NiFi AuthZ the request.
- (And 4) Regardless of whether a Site-to-Site NiFi is secured, there’s only one way to AuthN Site-to-Site client, that is client certificate. Other login credentials can not be used with Site-to-Site. A client NiFi uses its certificate configured in a key store, which is defined in nifi.properties.
- NiFi also authenticate other NiFi instances when clustering protocol is secured. Client certificates are used to do so.

Icons are provided by: Icon pack by Icons8 and simpleicon
How to use LDAP to AuthN requests?
I used an OpenLDAP docker container. To start a LDAP server, execute command below:
docker run --name my-openldap -p 389:389 -p 636:636 -d osixia/openldapThen LDAP server is accessible using docker machine ip.
Next, you need to configure nifi.properties:
nifi.security.user.login.identity.provider=ldap-providerAlso, login-identity-providers.xml needs to be configured like below:
  <provider>
    <identifier>ldap-provider</identifier>
    <class>org.apache.nifi.ldap.LdapProvider</class>
    <property name="Authentication Strategy">SIMPLE</property>
    <property name="Manager DN">cn=admin,dc=example,dc=org</property>
    <property name="Manager Password">admin</property>
    <property name="Connect Timeout">10 secs</property>
    <property name="Read Timeout">10 secs</property>
    <property name="Url">ldap://192.168.99.100</property>
    <property name="User Search Base">dc=example,dc=org</property>
    <property name="User Search Filter">cn={0}</property>
    <property name="Authentication Expiration">12 hours</property>
  </provider>
Then, restart NiFi. Please also refer NiFi docs.
How to display a NiFi login window?
To be honest, this was the most difficult step for me to figure out.. If I specify a client cert, then NiFi won’t respond with a login screen..
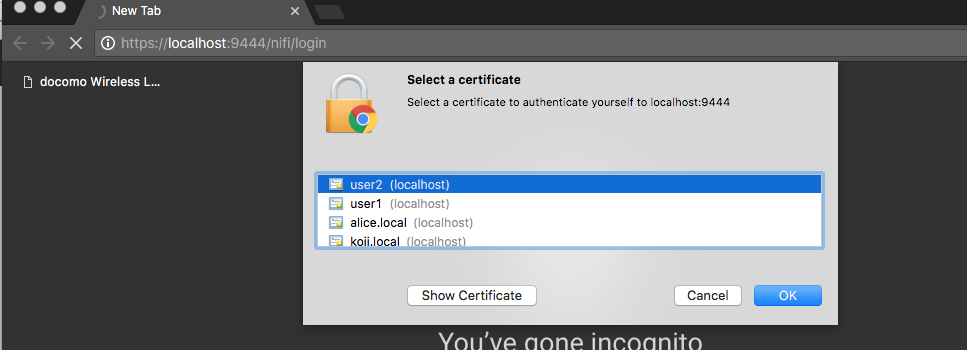
In order to Not Select a certificate is just simply click Cancel button!
Then you can see the Log In window. The docker container has an admin user configured.
I used admin as User, and admin as Password to login NiFI.
AuthZ by DN or mapped UserId
Finally, I’d like to mention about policy setting and DN mapping feature.
After NiFi AuthN an user request, it uses DN as user identifier e.g. cn=admin,dc=example,dc=org, even if I typed and logged in with admin.
So, the DN cn=admin,dc=example,dc=org should be configured properly in NiFi policy settings to view the UI.
However, DN looks complicated, doesn’t it? You may want to make it looks simpler.
Or if multiple AuthN mechanisms are used but you’d like to consolidate how an user identifier looks like (e.g. admin), then DN mapping feature might be handy.
You can find following example entries in nifi.properties:
# Identity Mapping Properties #

# These properties allow normalizing user identities such that identities coming from different identi ty providers

# (certificates, LDAP, Kerberos) can be treated the same internally in NiFi. The following example dem onstrates normalizing

# DNs from certificates and principals from Kerberos into a common identity string:

#

# nifi.security.identity.mapping.pattern.dn=^CN=(.*?), OU=(.*?), O=(.*?), L=(.*?), ST=(.*?), C=(.*?)$

# nifi.security.identity.mapping.value.dn=$1@$2
By using these mapping definitions, AuthZ policies can be managed easier.
NiFi WebSocket support
04 Nov 2016
This post is meant for describing how NiFi WebSocket components work. It is currently under reviewing process, so the final design might be different.
Basics of WebSocket protocol
WebSocket is a fully duplex and bi-directional protocol. The most interesting characteristics (at least for me) is that there is no difference or roll such as server or client for each peer after those established a WebSocket connection. Each peer can send messages at will. However, a connection is always initiated by a WebSocket client.
For example:
- A client sends a HTTP request to a server (URL e.g. ws://example.com/web-socket).
- The server accepts the request and upgrade HTTP protocol to WebSocket protocol.
- (at this point, each peer can send or receive messages asynchronously)
- The client can send a message to the server
- The server receives it
- The server can send a message to the client
- The client receives it
I wondered, should NiFi be a client? or a server? Then decided to support both. NiFi can be not only a WebSocket client, but also a WebSocket server!
How it works? Modules
Since the protocol itself is more complex than (or simply different from) other protocols, it was tough to put it into NiFi data flow processing model. Some might feel it is too complex to use, so let me try to explain how it works.

As shown in above diagram, it is divided into three modules described below, for extensibility and testability.
Each of these are individual NAR.
Both nifi-websocket-processors-nar and nifi-websocket-services-jetty-nar have NAR dependency to nifi-websocket-services-api-nar.
nifi-websocket-services-api
- WebSocketClientService: An Interface acts as a WebSocket client.
- WebSocketServerService: An Interface acts as a WebSocket server.
- Features:
- WebSocket events: Both Client and Server services adopt event-driven processing so that WebSocket processors can react to.
connected: Fired when a remote client connects with WebSocketServerService, or a WebSocketClientService connects with a remote WebSocket server.text message: Fired when it receives text WebSocket message.binary message: Fired when it receives binary WebSocket message.
- Send message: Provides methods to send text and binary WebSocket message to a connected remote peer.
- Multiple endpoints: It registers processors to endpoints. WebSocketServerService uses an URI path as an endpoint. For example, the same WebSocket server instance can manage two WebSocket endpoints, such as
ws://hostname:listen-port/endpoint-1andws://hostname:listen-port/endpoint-2. Connected sessions are manages separately within each endpoints. Likewise, WebSocketClientService uses aclientIdto distinguish endpoints. Multiple WebSocket client instances can share the same WebSocketClientService instance.
- WebSocket events: Both Client and Server services adopt event-driven processing so that WebSocket processors can react to.
nifi-websocket-services-jetty
This module contains actual implementation of nifi-websocket-services-api using Jetty.
- Features:
- Plain WebSocket (ws://), and Secure WebSocket (wss://) protocols are supported.
- Uses SSLContextService to refer Java keystore and truststore for secure communication.
nifi-websocket-processors
In order to use these functionalities in a NiFi data flow, we need to put it on a canvas as Processors.
ConnectWebSocketandListenWebSocket: These work as WebSocket gateways. These processors are registered to WebSocketServer and receives WebSocket events described earlier. When those events are fired, it will be converted to NiFi FlowFile, then sent to relationships accordingly. There are three relationships,connected,text messageandbinary message. ConnectWebSocket uses WebSocketClientService to actively connect to a remote WebSocket endpoint, while ListenWebSocket uses WebSocketServerService to wait passively for remote WebSocket clients to connect.PutWebSocket: This processor can use with both ConnectWebSocket and ListenWebSocket, since there is no distinction after connection is made. It sends a WebSocket message using an incoming FlowFile content as message payload.
How can I use? Use Cases
Ok, enough descriptions, let’s see how can we use these component in NiFi data flow!
NiFi as a client to talk with a remote WebSocket server
To use NiFi as a WebSocket client, we need a WebSocketClientService. To add the service:
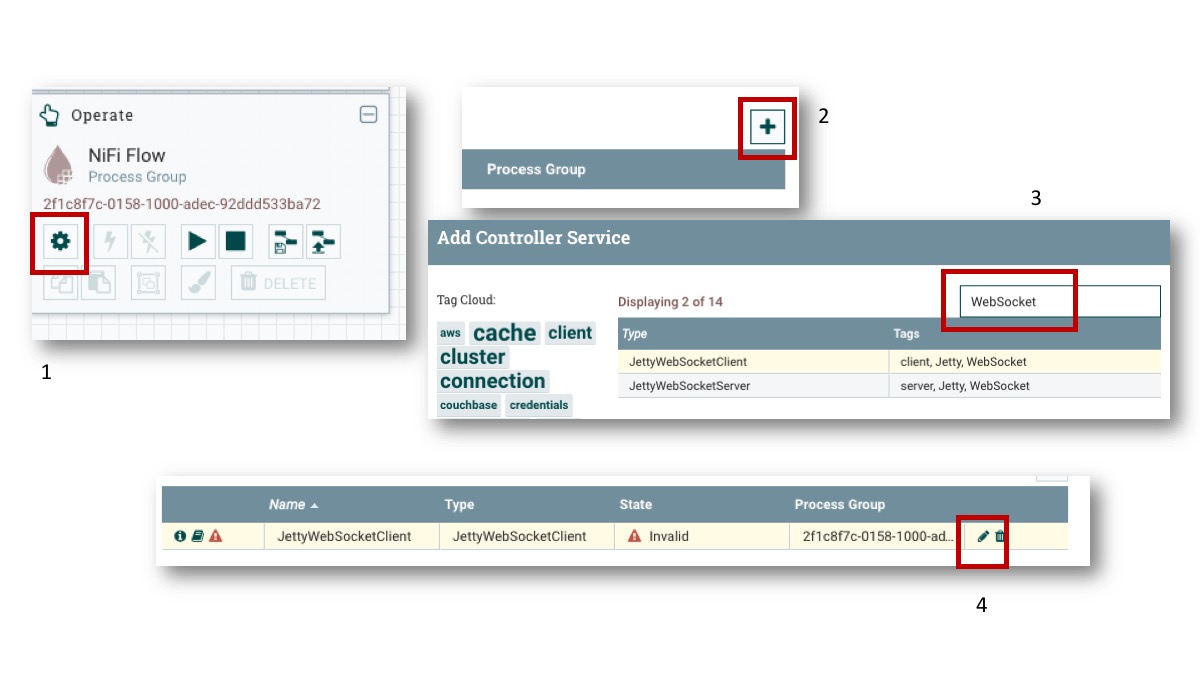
- Click the gear icon on Operate palette
- Click the plus sign
- Enter ‘WebSocket’ tag to search the ControllerService
- Click the edit icon of the JettyWebSocketClient controller service
Then, the service needs to be configured as follows:
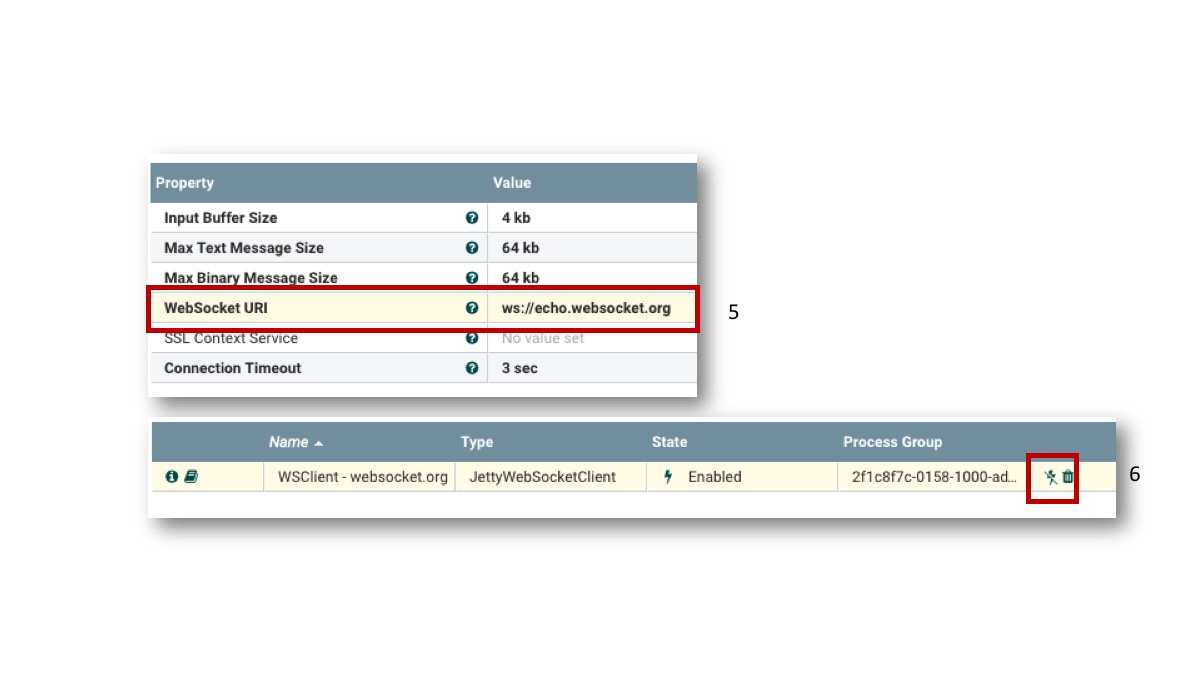
- Set ws://echo.websocket.org to WebSocket URI. This URI is publicly available to test WebSocket client. It simply echoes back the message it receives.
- Click the enable icon, and the service is ready!
Next, let’s setup the data flow using processors:

- ConnectWebSocket: Uses the JettyWebSocketClientService added earlier.
connectedandtext messageare routed to ReplaceText.binary messageis terminated here because we don’t use it in this example. - ReplaceText: Add some prefix to update text content
- PutWebSocket: This processor sends messages to the remote WebSocket server. Don’t forget to set
Run Schedulelonger than default like 3 sec, otherwise this ping-pong loop goes too fast like DoS attack… - UpdateAttribute: This is the end of data flow, and keep it stopped so that we can accumulate the FlowFiles in the relationship and check the contents
By right click the success relationship, the queued FlowFiles can be seen. Its file size is growing as ReplaceText prepend text each time.

NiFi as a server to talk with a remote WebSocket client
Once you get the idea, setting up NiFi as a WebSocket server is easy, almost the same!
We just need to use JettyWebSocketServer controller service instead, and set Listen Port:

Then, replace the ConnectWebSocket processor with ListenWebSocket processor, and specify the Server URL Path that you want to receive WebSocket requests:

Then, open websocket.org echo from a web browser, set location as ws://localhost:9001/server-demo, and click Connect, then Send. NiFi will echo back the message!
Secure WebSocket connection
To use secure WebSocket connection, we need another controller service, StandardSSLContextService. Then use it from JettyWebSocketClient or JettyWebSocketServer. The URL should use wss:// protocol for secure connection.
Scalability
When NiFi is deployed as a cluster for scalability, we can run these WebSocket component on every node. To distribute loads when you use NiFi as WebSocket server, you will need a Load Balancer such as HAProxy in front of NiFi cluster. Please also refer the previous post, NiFi Cluster and Load Balancer.
Summary
In this post, I covered the basic usage of these WebSocket controller services and processors. Since the WebSocket gateway processors (ConnectWebSocket/ListenWebSocket) and PutWebSocket can be used separately, we can design more complex and interesting data flow by putting more flow in between.
I hope this post will help the Pull Request reviewing process to go smoothly, and these will be merged into master soon!
Thanks for reading!